> For the complete documentation index, see [llms.txt](https://docs.mikopbx.com/mikopbx/llms.txt). Markdown versions of documentation pages are available by appending `.md` to page URLs; this page is available as [Markdown](https://docs.mikopbx.com/mikopbx/english/modules/miko/module-local-speech-to-text/quick-start.md).

# Quick Start

Quick start for the Local Speech To Text module and Local STT Worker

### Installing the module

1. Open the MikoPBX web interface.
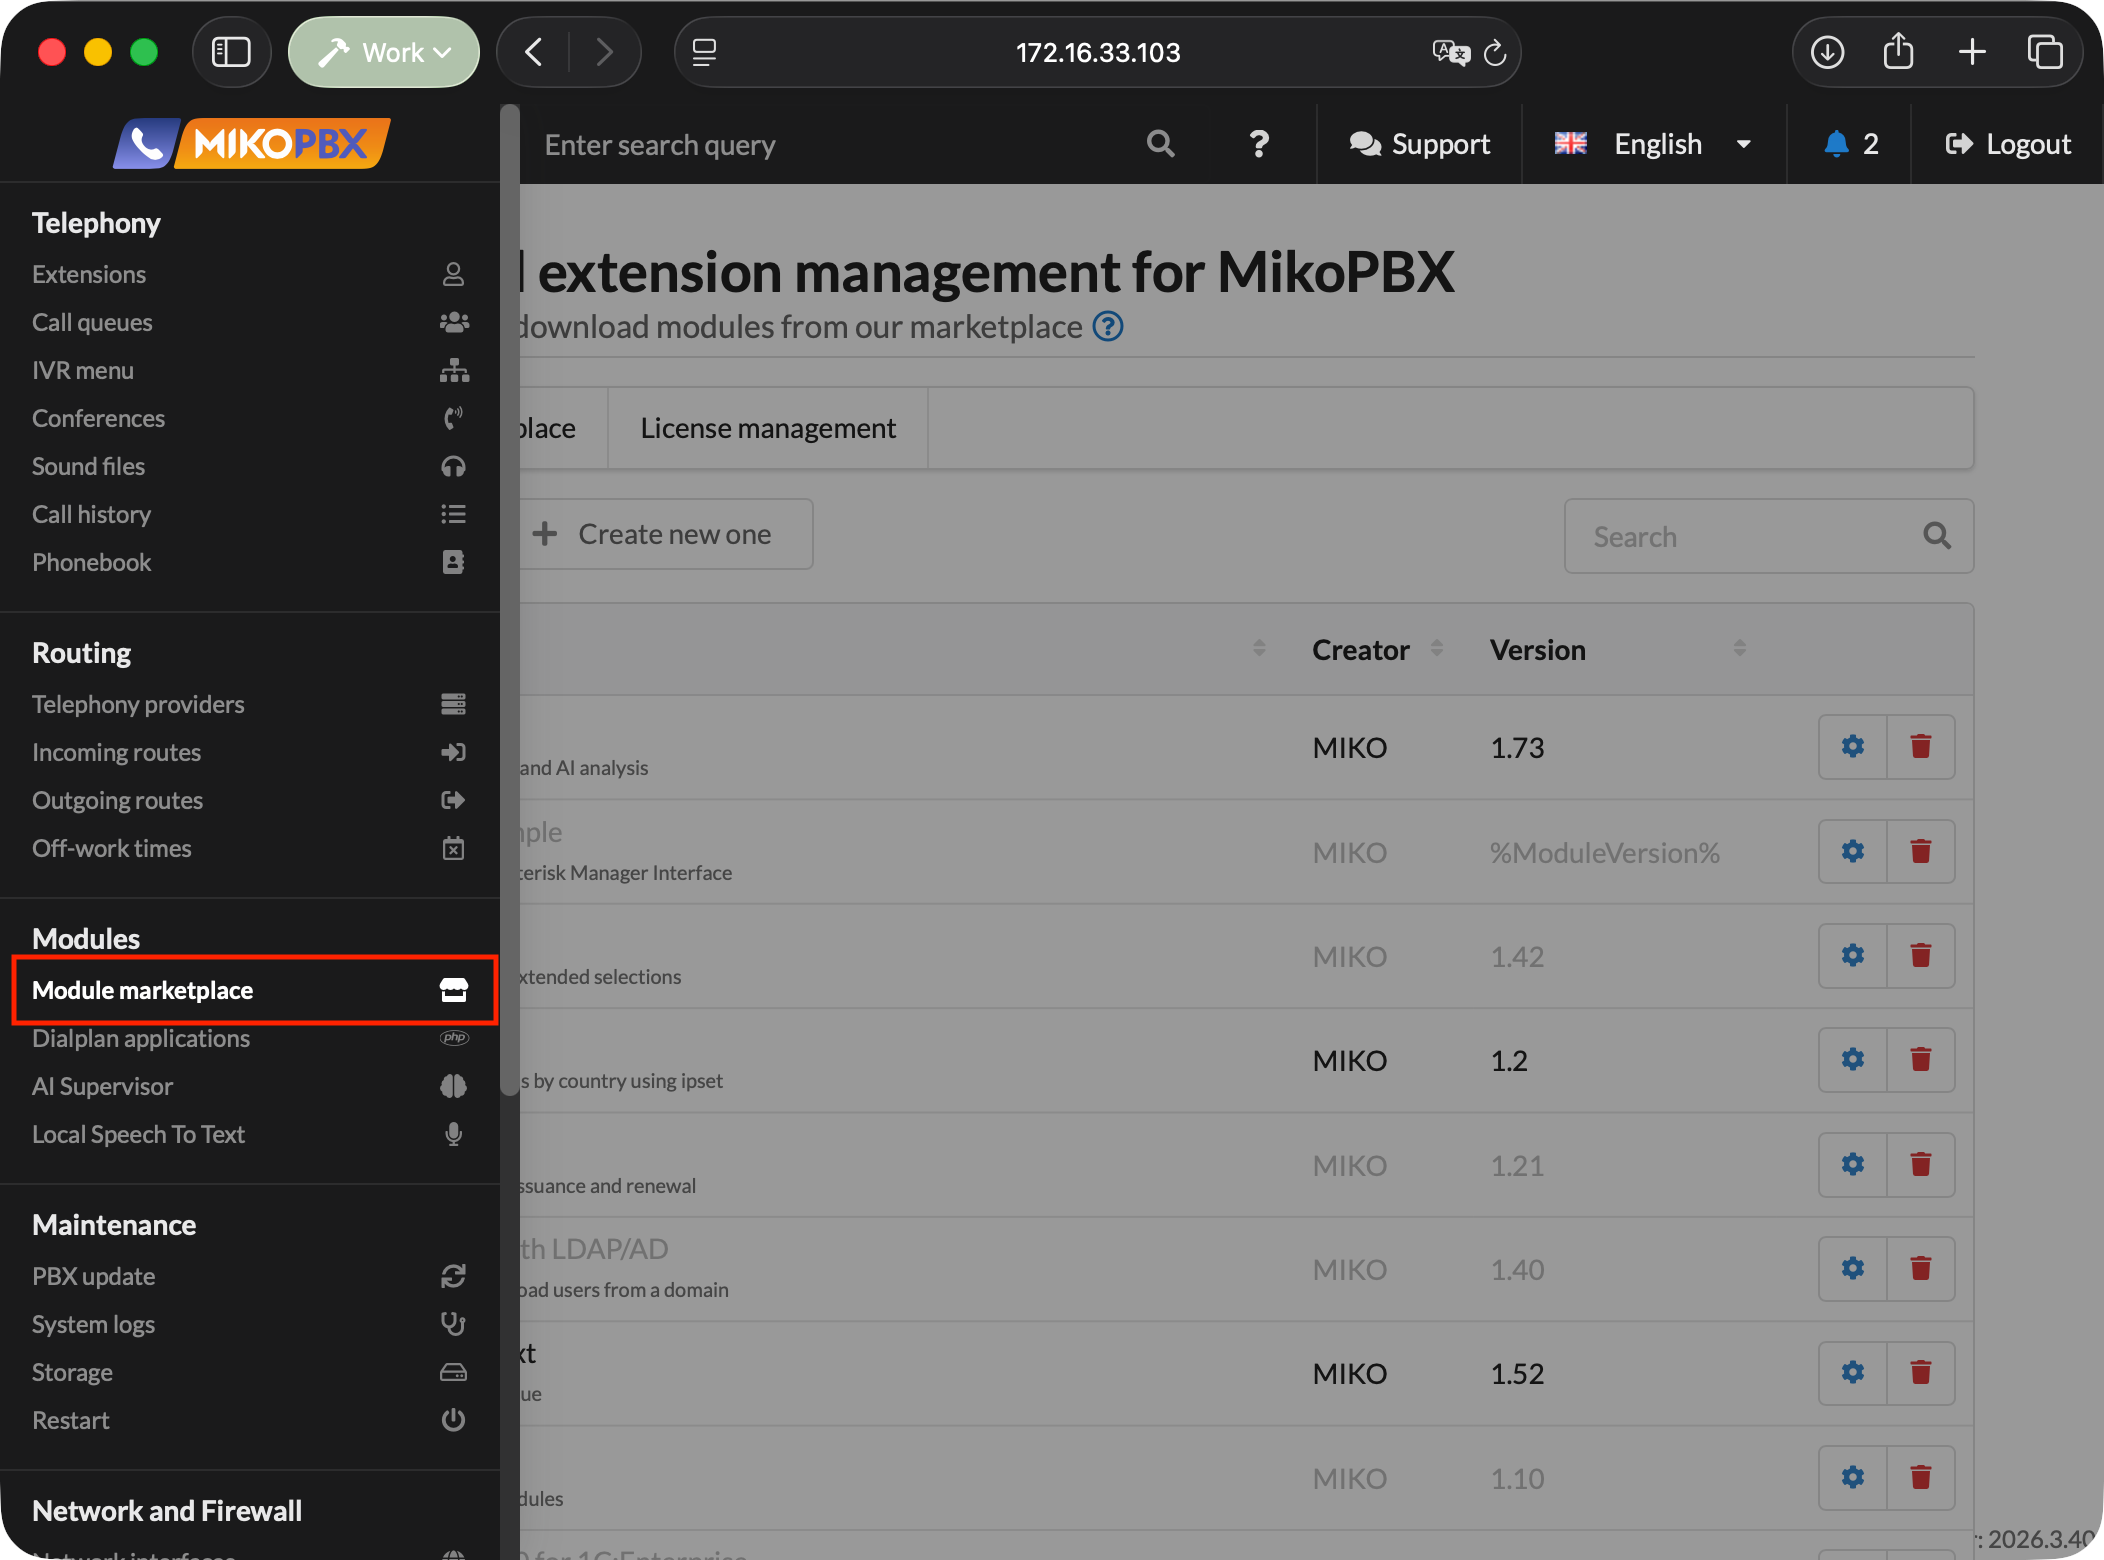
2. Go to **Modules** → **Module marketplace**.

<figure><img src="https://835495363-files.gitbook.io/~/files/v0/b/gitbook-x-prod.appspot.com/o/spaces%2FsZ8acWnNlSalIHQjMFu1%2Fuploads%2Fgit-blob-077c6ead7c0da0da965a81334a88a7d27f7b4532%2FMikoPBXModuleMarketplace.png?alt=media" alt=""><figcaption><p>Module marketplace</p></figcaption></figure>

3. Find **Local Speech To Text** and install it.
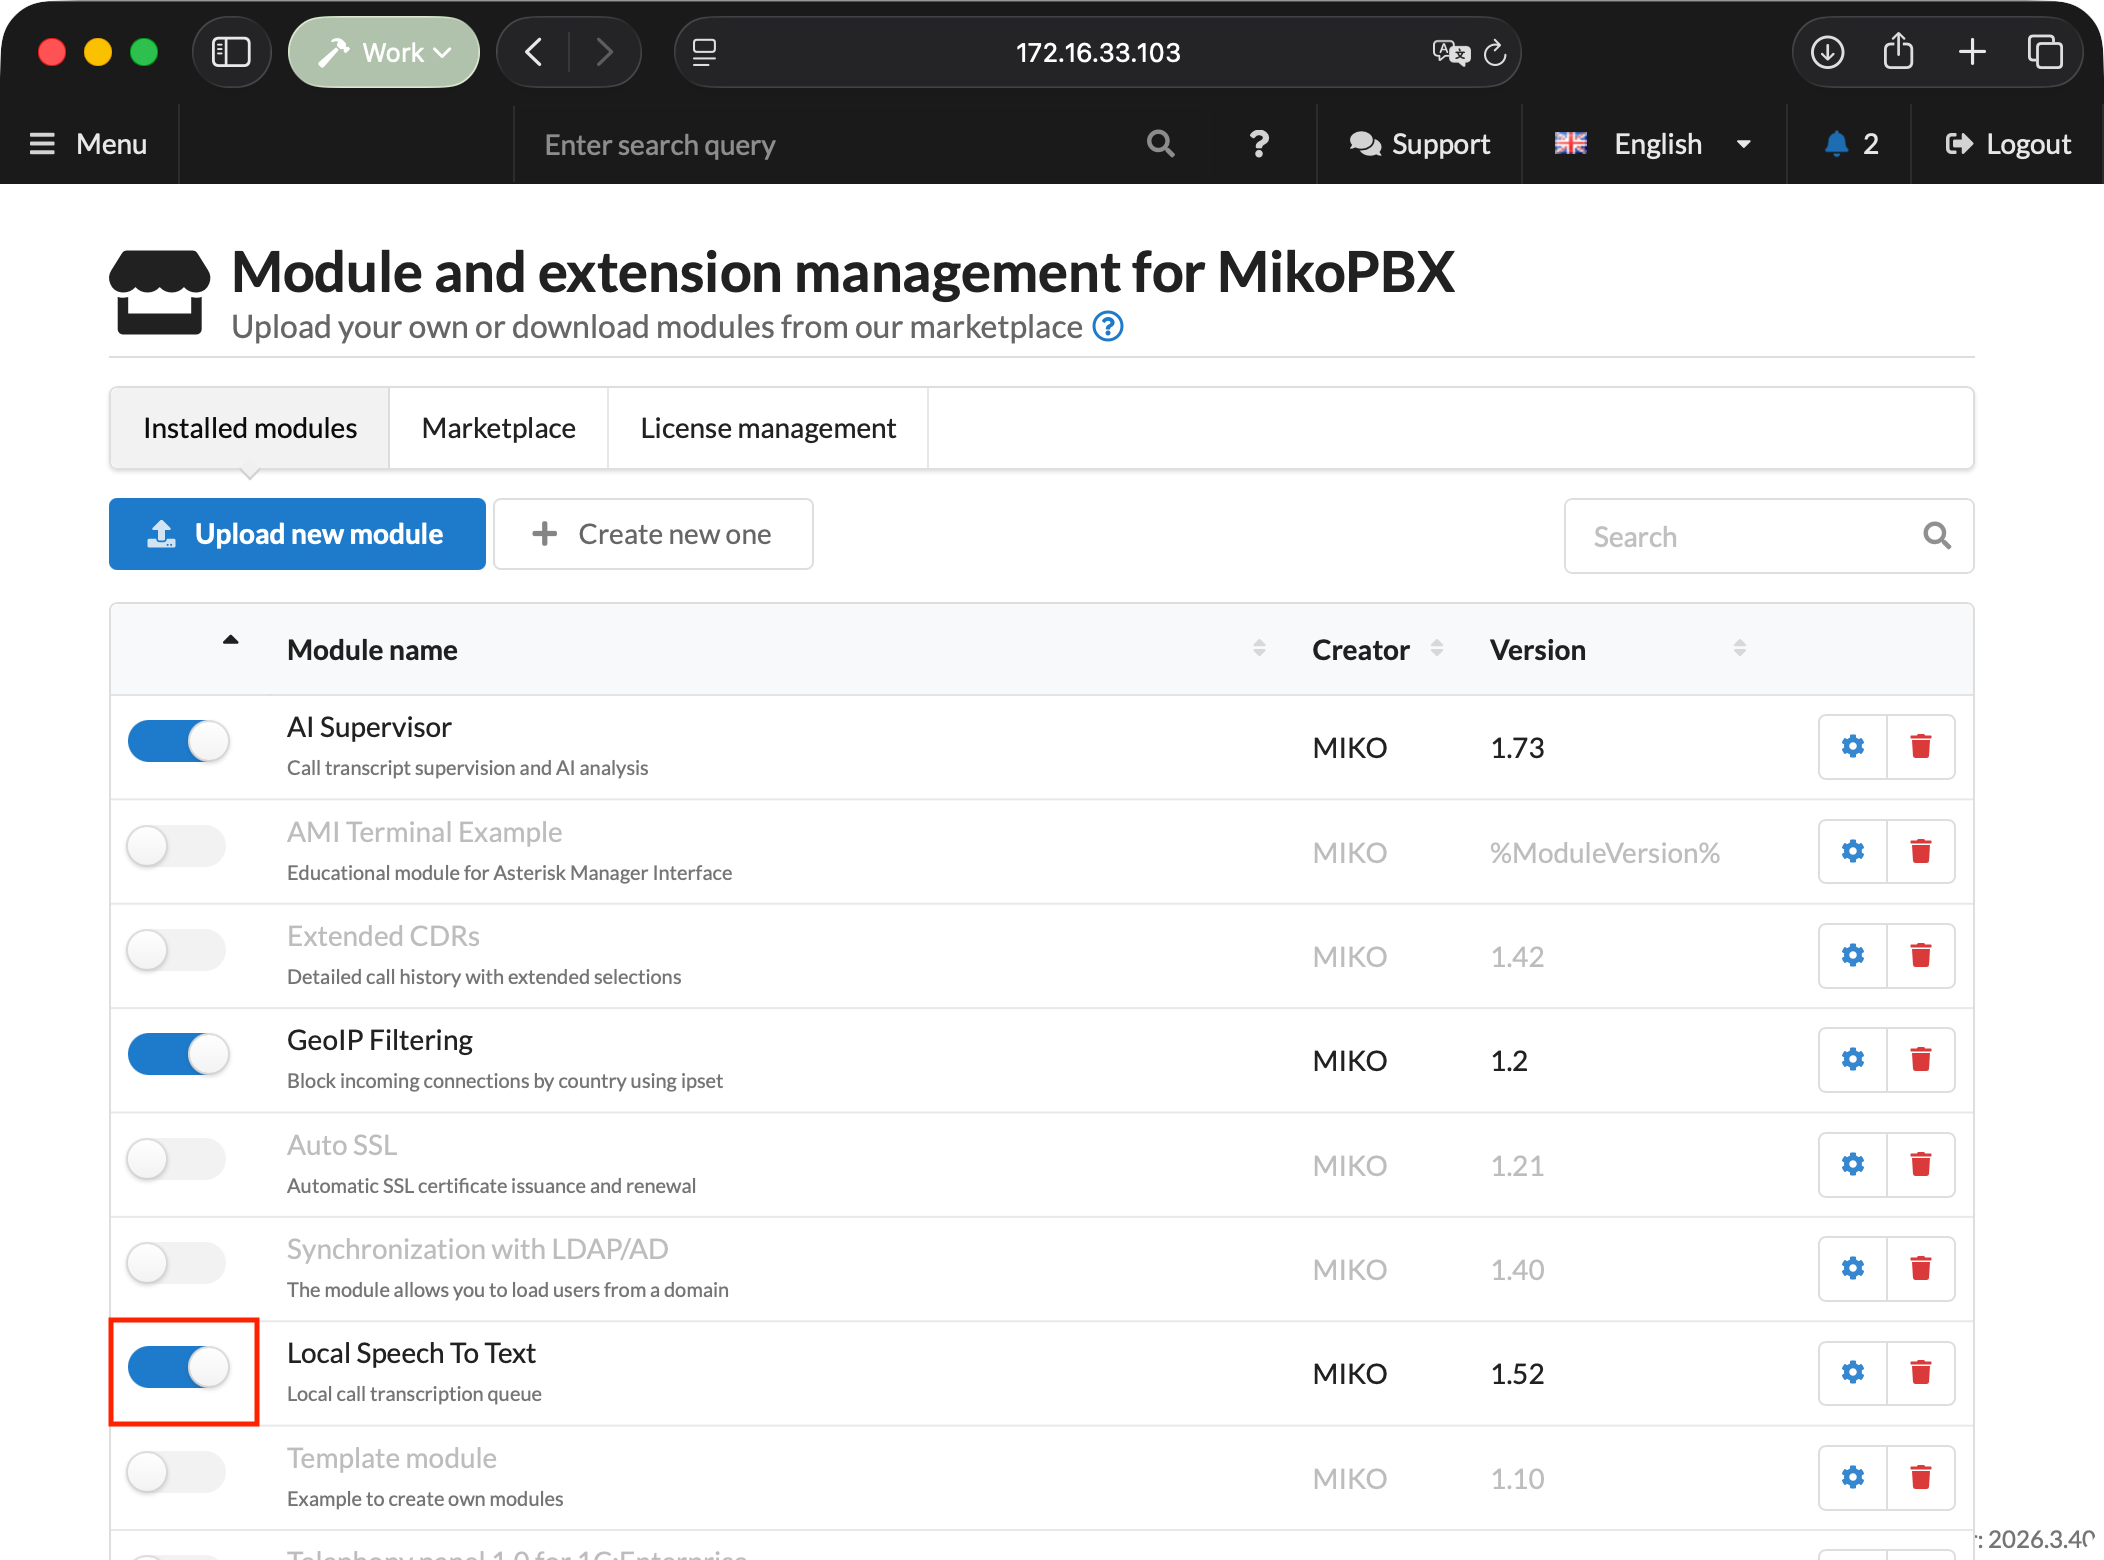
4. Open the **Installed modules** tab and enable the module.

<figure><img src="https://835495363-files.gitbook.io/~/files/v0/b/gitbook-x-prod.appspot.com/o/spaces%2FsZ8acWnNlSalIHQjMFu1%2Fuploads%2Fgit-blob-077b38438ef15d93da435d874a349c7e0eb709f6%2FSTTModuleInstalledModulesSection.png?alt=media" alt=""><figcaption><p>Enabling Local Speech To Text</p></figcaption></figure>

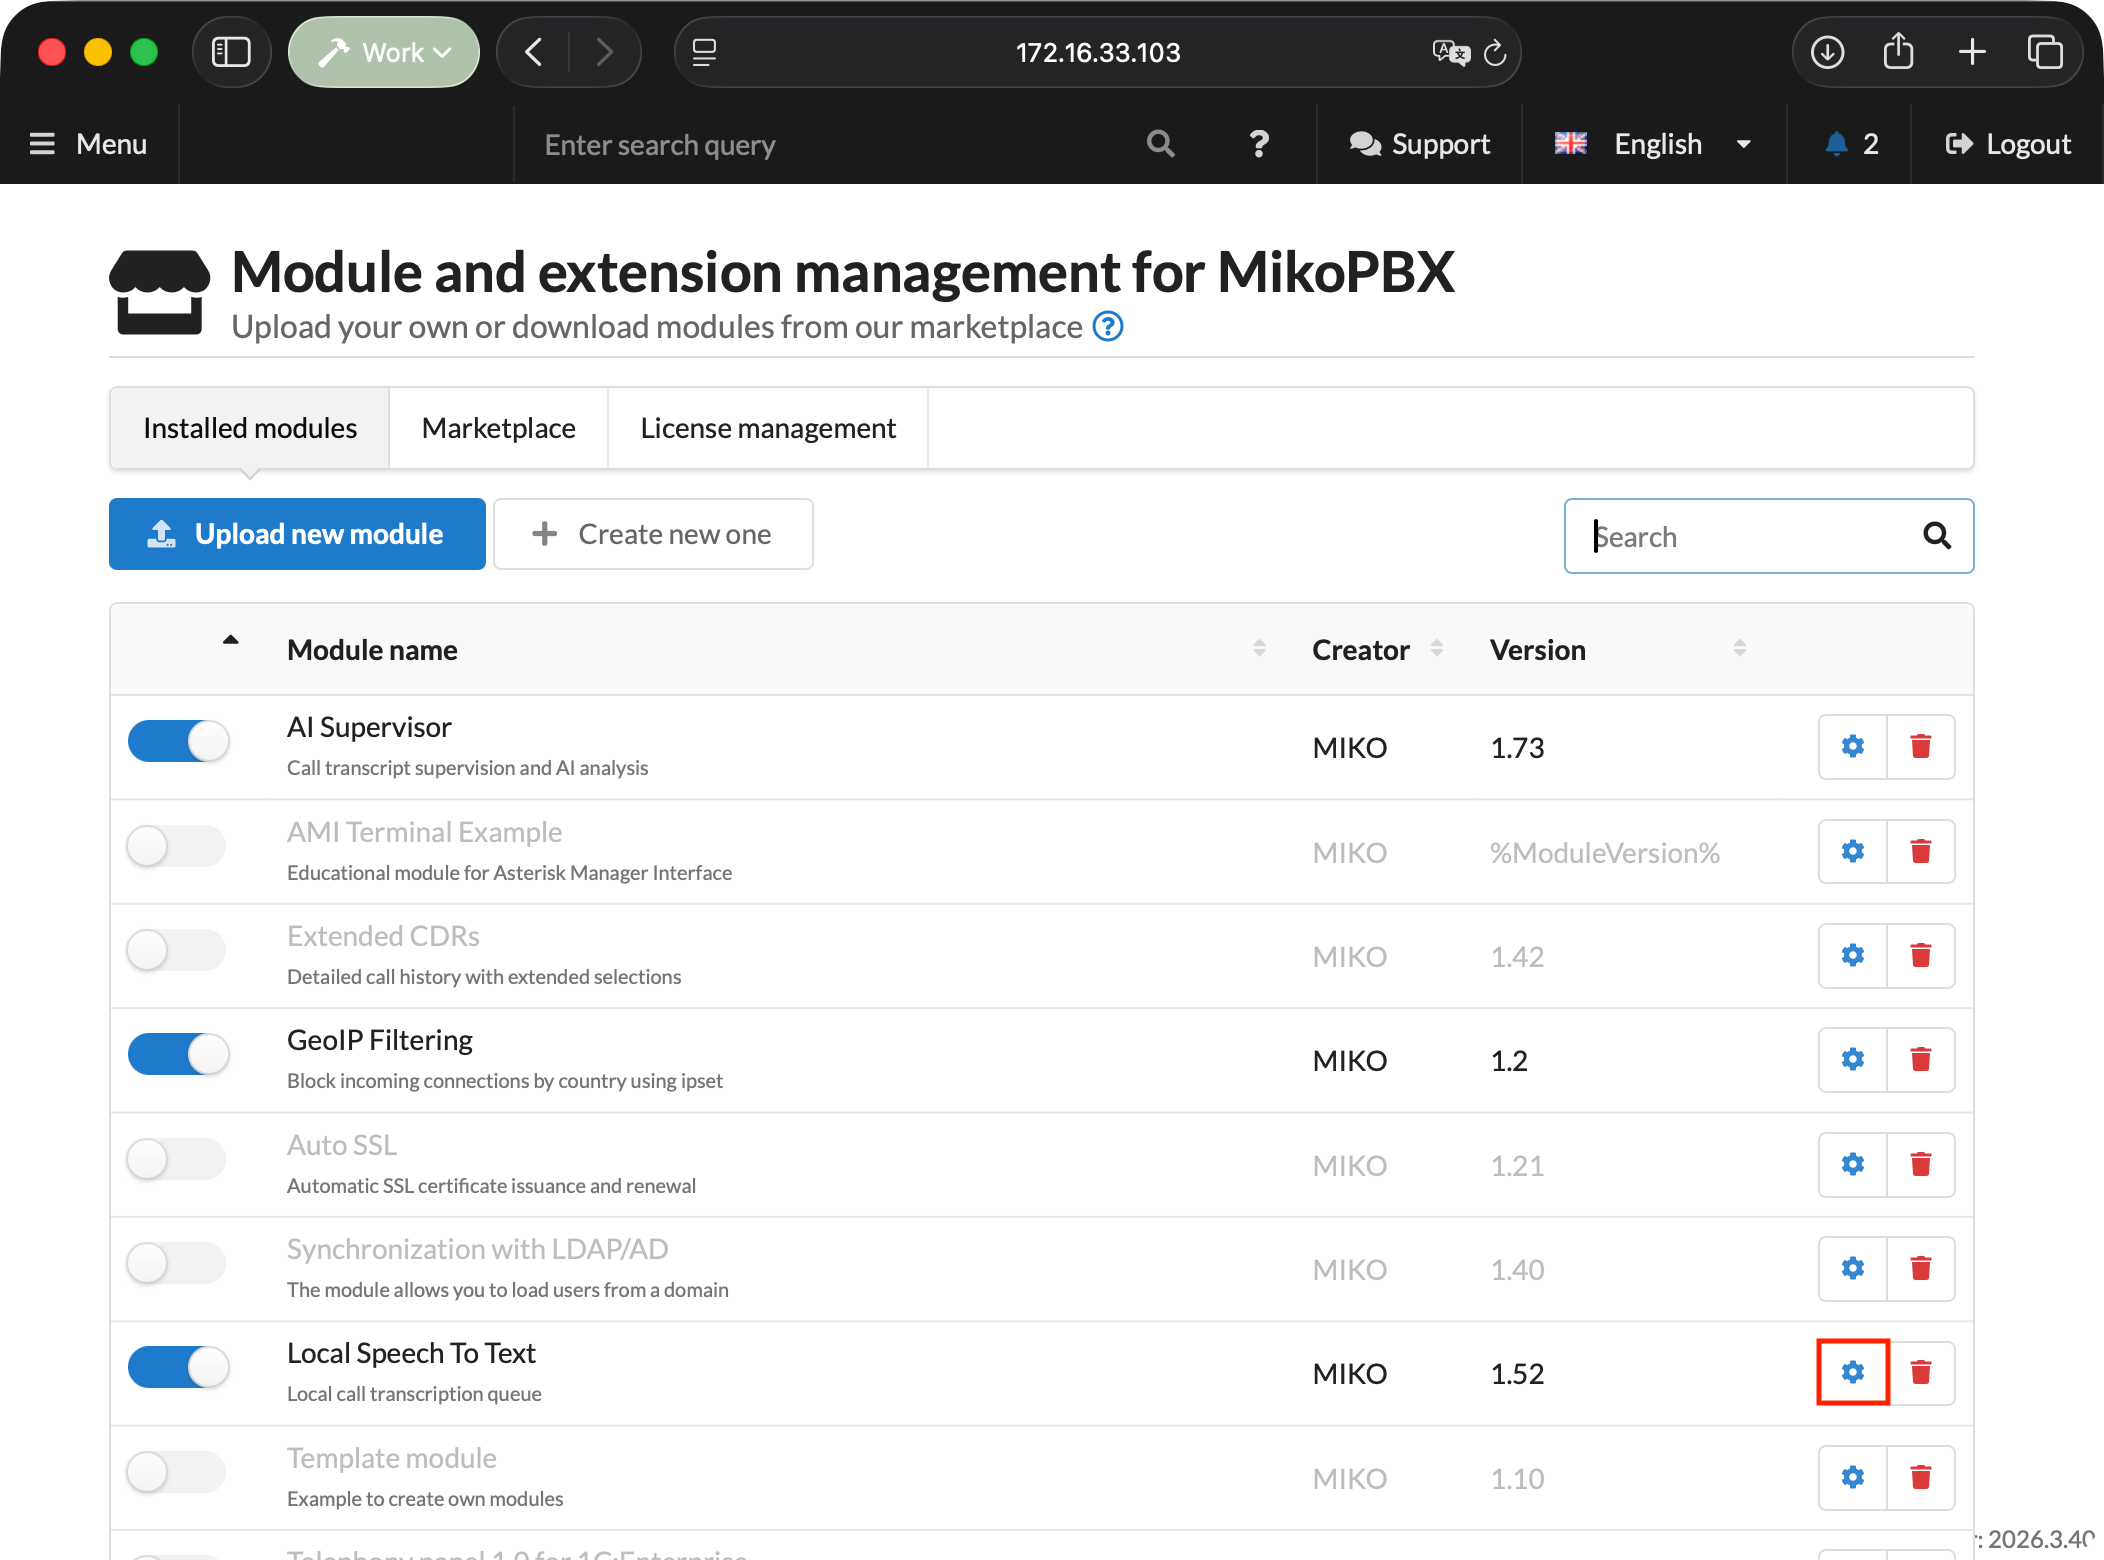
5. Click the settings button to the right of the module version.

<figure><img src="https://835495363-files.gitbook.io/~/files/v0/b/gitbook-x-prod.appspot.com/o/spaces%2FsZ8acWnNlSalIHQjMFu1%2Fuploads%2Fgit-blob-bff0f5af9e68d73e3db472618be79c22447b9513%2FSTTModuleOpen.png?alt=media" alt=""><figcaption><p>Opening the module page</p></figcaption></figure>

### Initial module setup

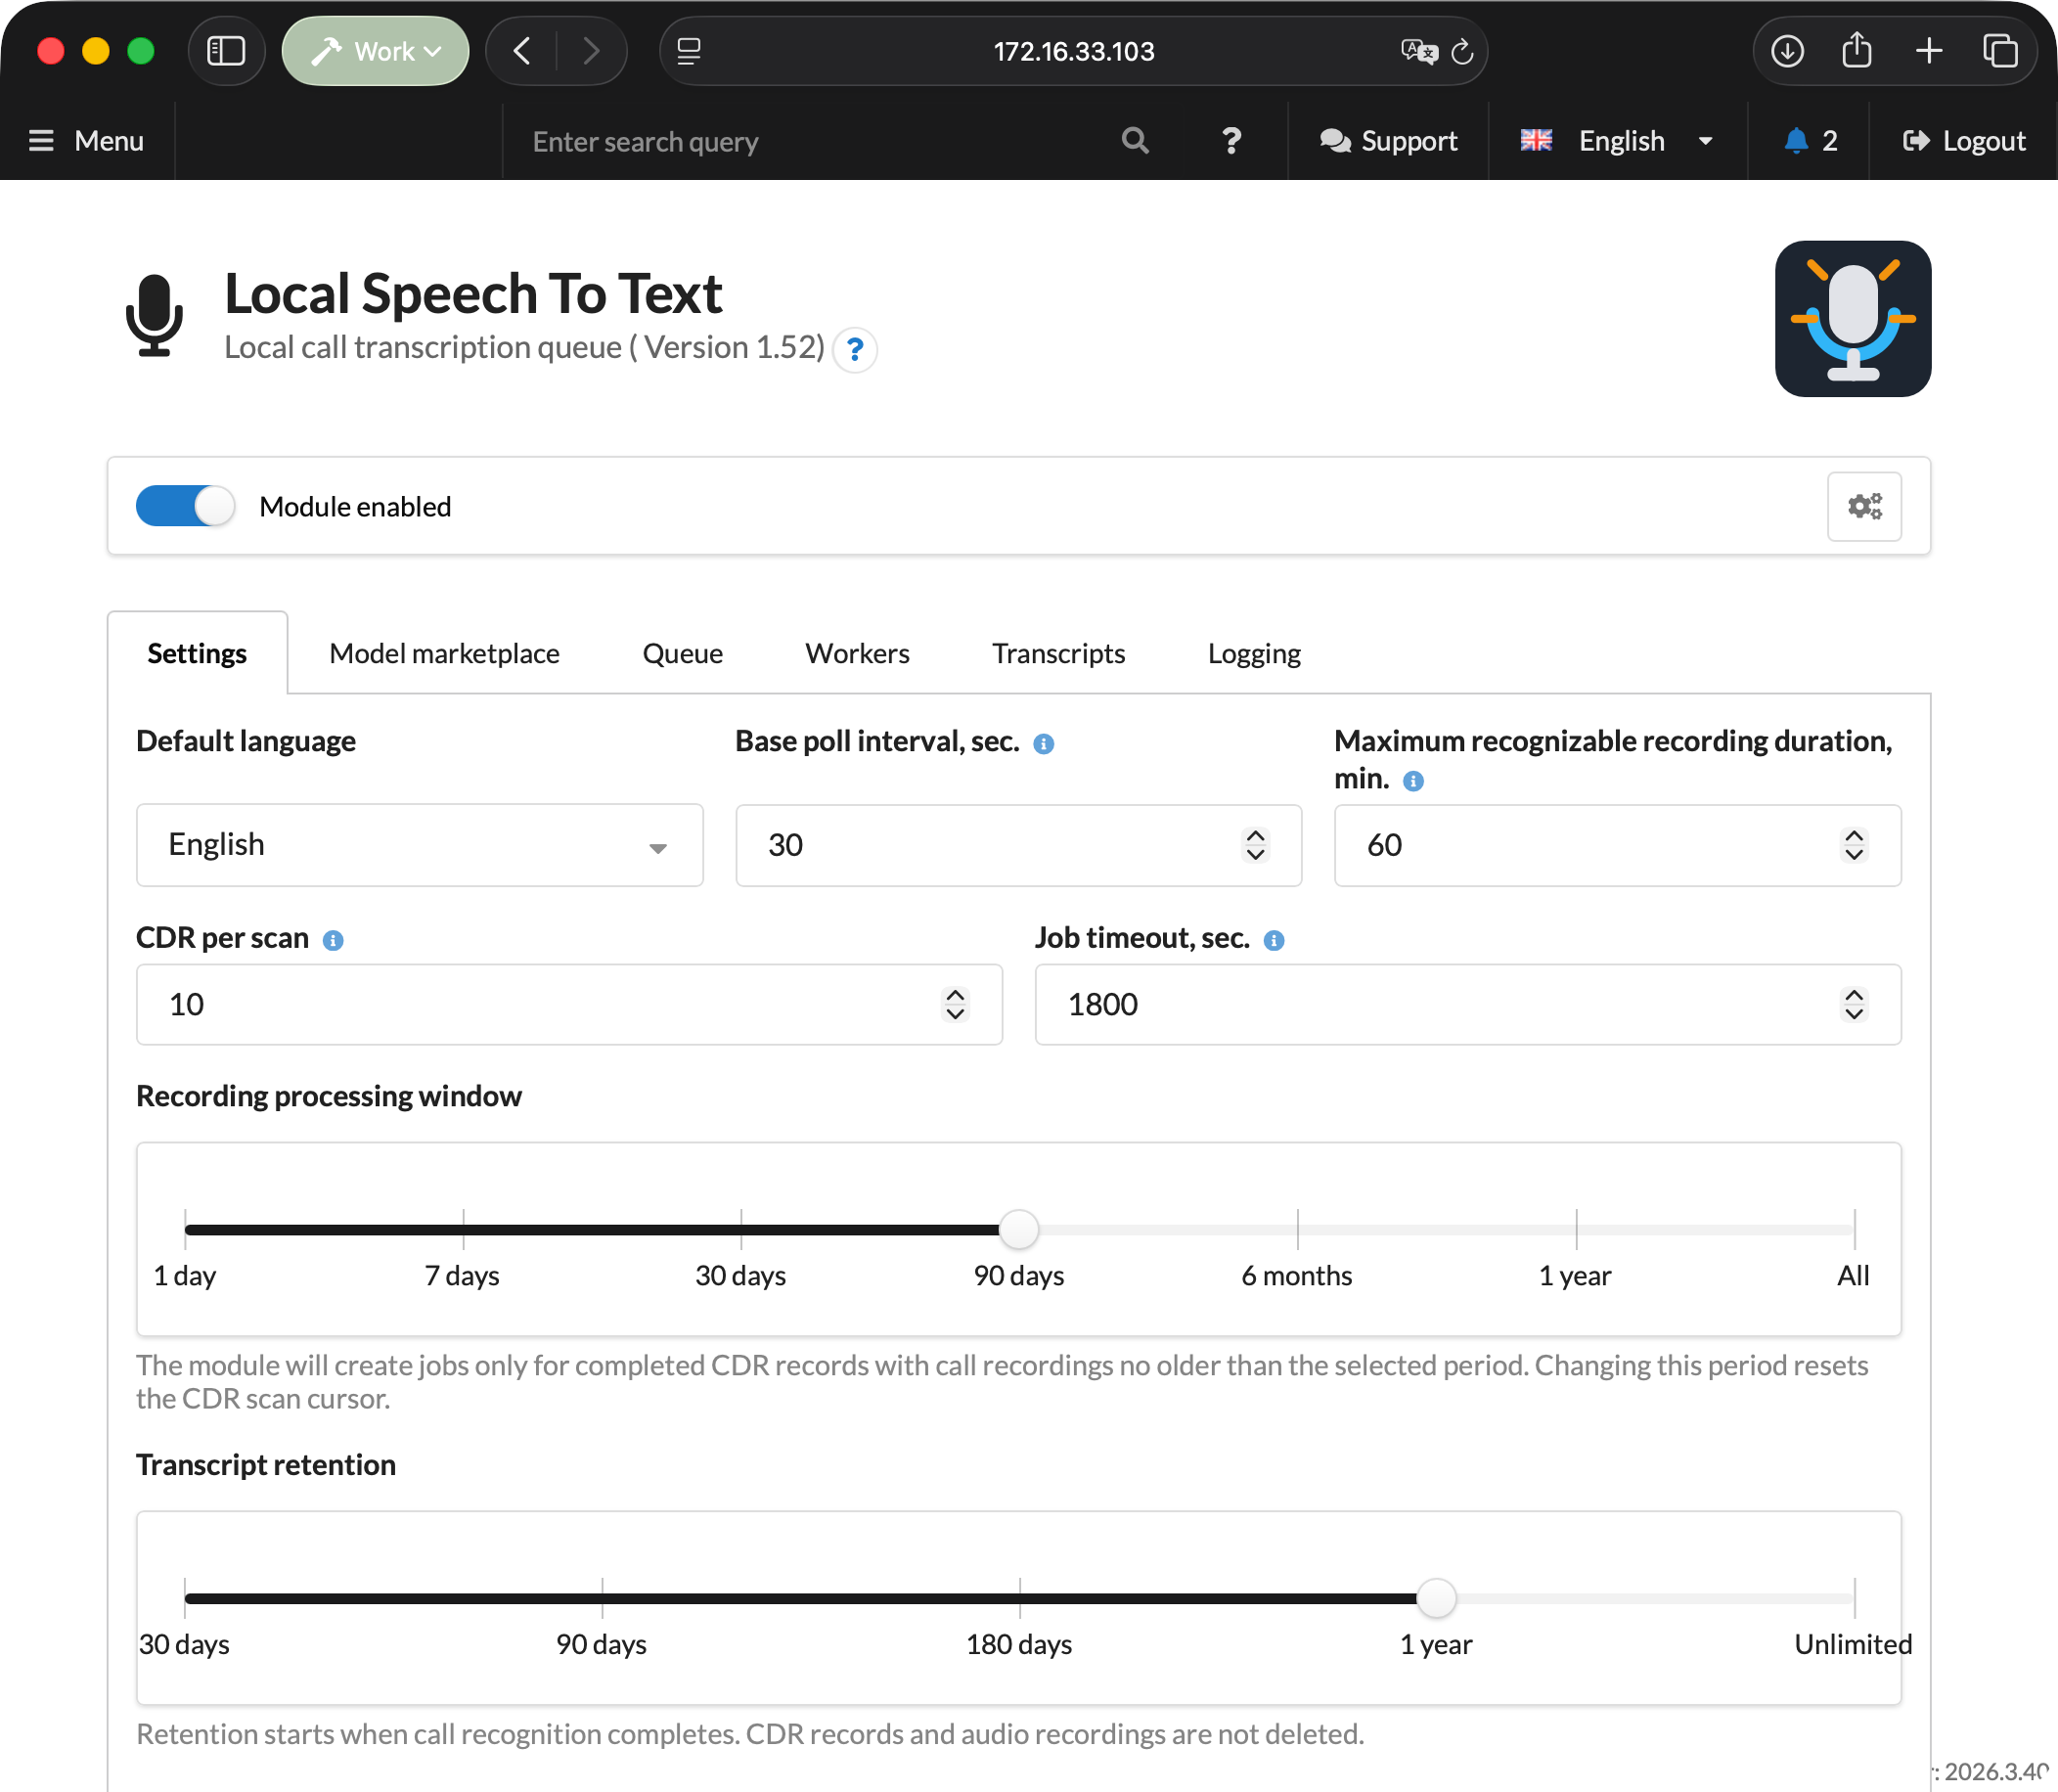
1. On the **Settings** tab, select the main language used in calls or leave **Detect automatically** selected.
2. Check **Maximum recognizable recording duration, min.** The default is 60 minutes.
3. Select the **Recording processing window** and **Transcript retention**. The processing window cannot exceed the retention period.
4. If necessary, add internal names and abbreviations under **Recognition terms**.
5. Save the settings.

<figure><img src="https://835495363-files.gitbook.io/~/files/v0/b/gitbook-x-prod.appspot.com/o/spaces%2FsZ8acWnNlSalIHQjMFu1%2Fuploads%2Fgit-blob-e14914481063f633abaad03690064e74dadcedc1%2FSTTModuleMain.png?alt=media" alt=""><figcaption><p>Module settings</p></figcaption></figure>

### Selecting a model

1. Open the **Model marketplace** tab.
2. Select the model for call transcription. The default **Parakeet TDT 0.6B v3** is recommended for most calls; use a WhisperKit model for languages outside Parakeet's 25 supported languages.
3. Click **Save model**.

{% hint style="info" %}
The selected model is downloaded to the Mac when the worker receives its first job. Keep the Mac connected to the internet until the model and its supporting files finish downloading.
{% endhint %}

<figure><img src="https://835495363-files.gitbook.io/~/files/v0/b/gitbook-x-prod.appspot.com/o/spaces%2FsZ8acWnNlSalIHQjMFu1%2Fuploads%2Fgit-blob-17b068b6346121f1546fa57f8f5858895f9f8f80%2FSTTModuleChoosingModel.png?alt=media" alt=""><figcaption><p>Selecting a recognition model</p></figcaption></figure>

### Creating a Worker API key

1. Open the **Workers** tab.
2. Click **Create API key**.
3. Copy the displayed token immediately. It cannot be viewed again after the page is refreshed.

{% hint style="info" %}
Create a separate key for each Mac. One key cannot be bound to multiple worker UIDs.
{% endhint %}

<figure><img src="https://835495363-files.gitbook.io/~/files/v0/b/gitbook-x-prod.appspot.com/o/spaces%2FsZ8acWnNlSalIHQjMFu1%2Fuploads%2Fgit-blob-0ce340376d7cc86dad3a1b1bd475988689a4bcfb%2FSTTModuleCreatingANewWorkerKey.png?alt=media" alt=""><figcaption><p>Creating a Worker API key</p></figcaption></figure>

### Connecting Local STT Worker

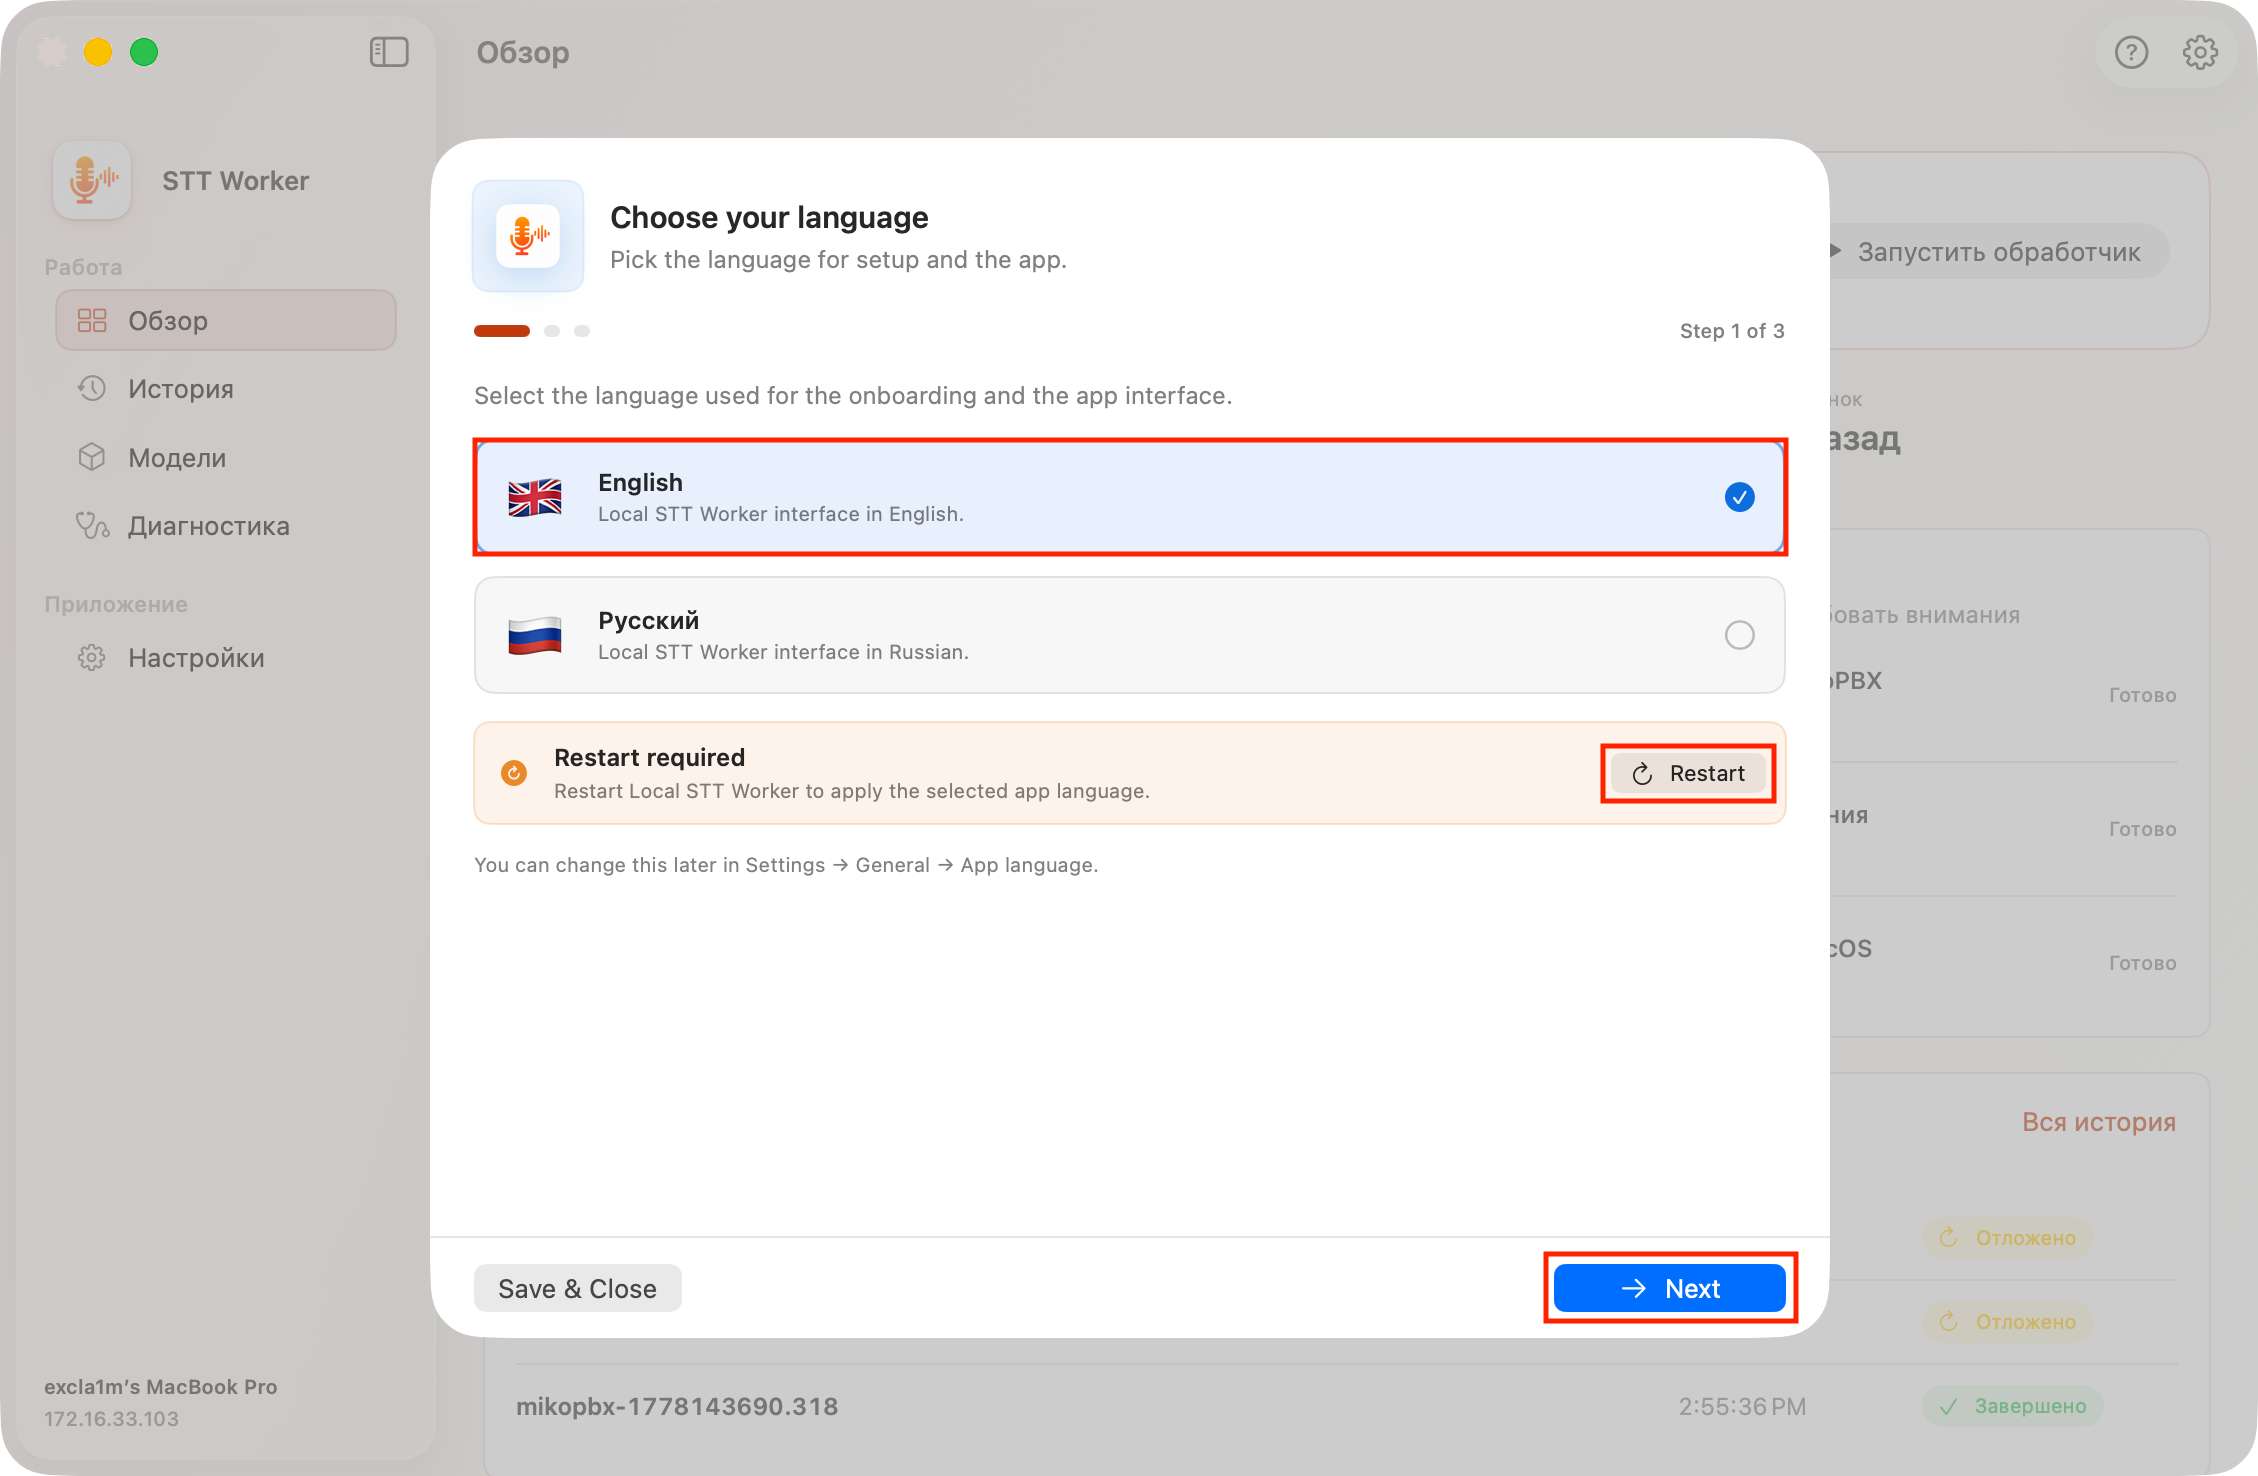
Install and open **Local STT Worker**. A three-step onboarding wizard appears on first launch.

#### Step 1. Language

Select English or Russian as the interface language, then click **Next**. Changing the language may require a restart; after restarting, the onboarding wizard opens again.

<figure><img src="https://835495363-files.gitbook.io/~/files/v0/b/gitbook-x-prod.appspot.com/o/spaces%2FsZ8acWnNlSalIHQjMFu1%2Fuploads%2Fgit-blob-0f4439fffb0912503f2444eec63f66d6363862d4%2FUPDSTTOnboardLang.png?alt=media" alt=""><figcaption><p>Selecting the Local STT Worker language</p></figcaption></figure>

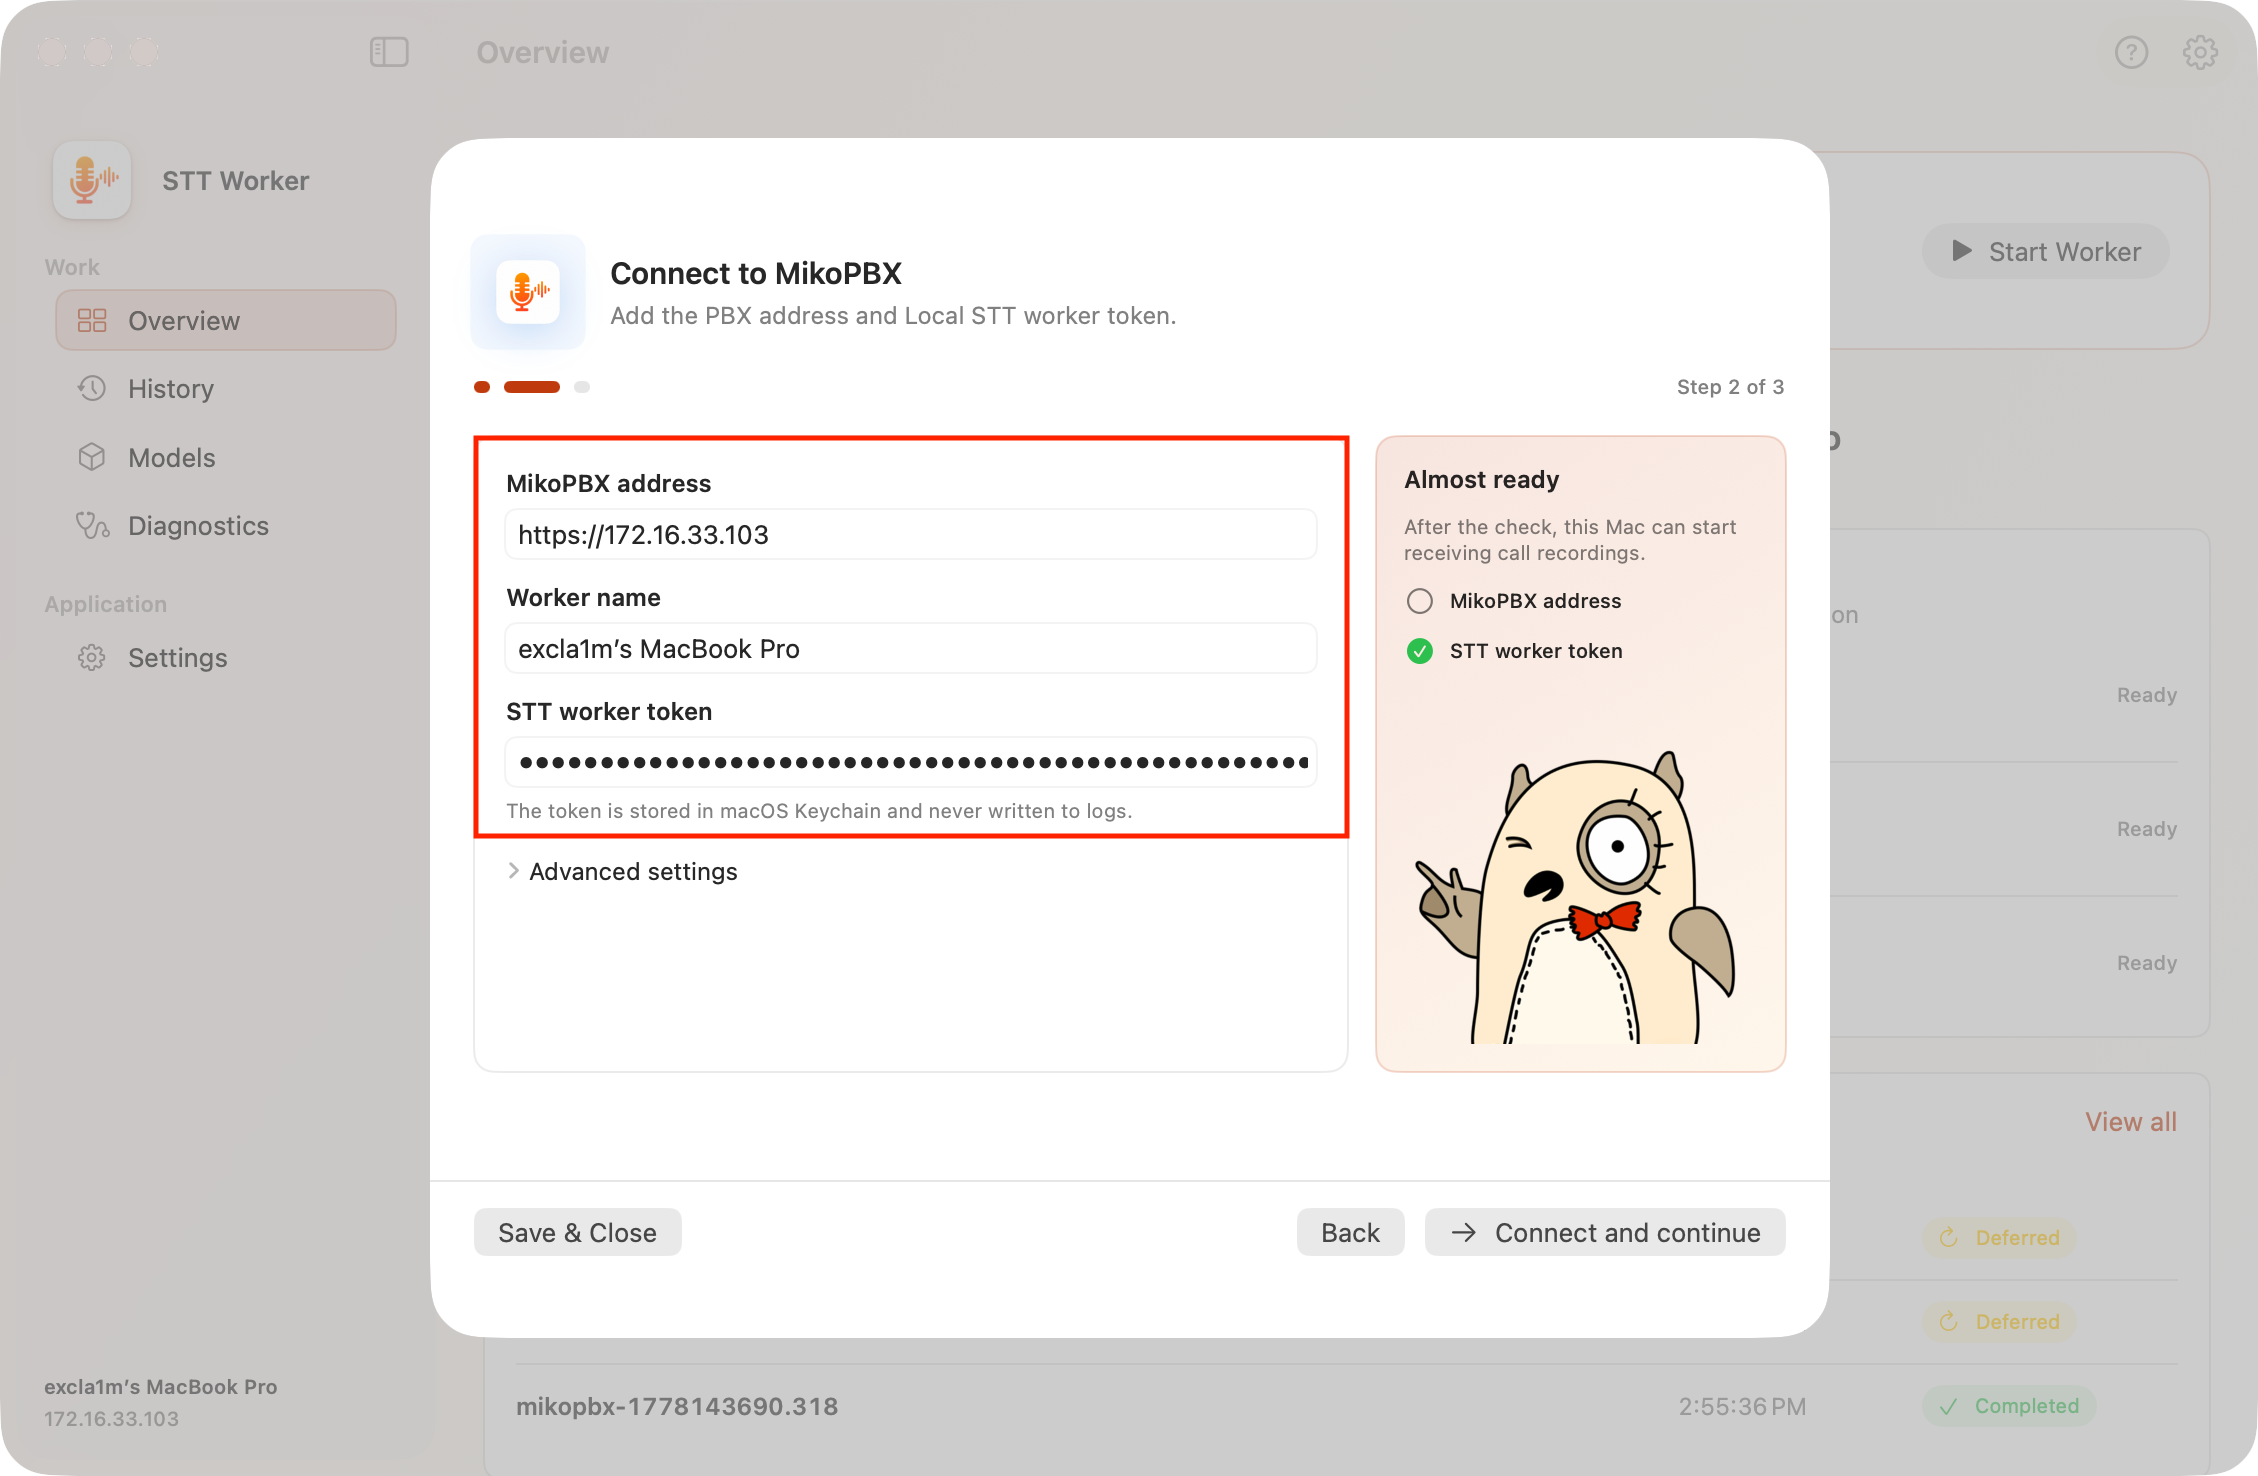
#### Step 2. Connect to MikoPBX

Complete these fields:

| Field                | What to enter                                                                 |
| -------------------- | ----------------------------------------------------------------------------- |
| **MikoPBX address**  | An address such as `https://pbx.example.com`, without credentials in the URL. |
| **Worker name**      | A recognizable Mac name that will be displayed in MikoPBX.                    |
| **STT worker token** | The key created on the **Workers** tab.                                       |

The token is stored in macOS Keychain and is never written to logs.

<figure><img src="https://835495363-files.gitbook.io/~/files/v0/b/gitbook-x-prod.appspot.com/o/spaces%2FsZ8acWnNlSalIHQjMFu1%2Fuploads%2Fgit-blob-0fe6c17a67caa4dfbb7862d4d3d177525662ff62%2FUPDSTTOndoardConnection.png?alt=media" alt=""><figcaption><p>Configuring the MikoPBX connection</p></figcaption></figure>

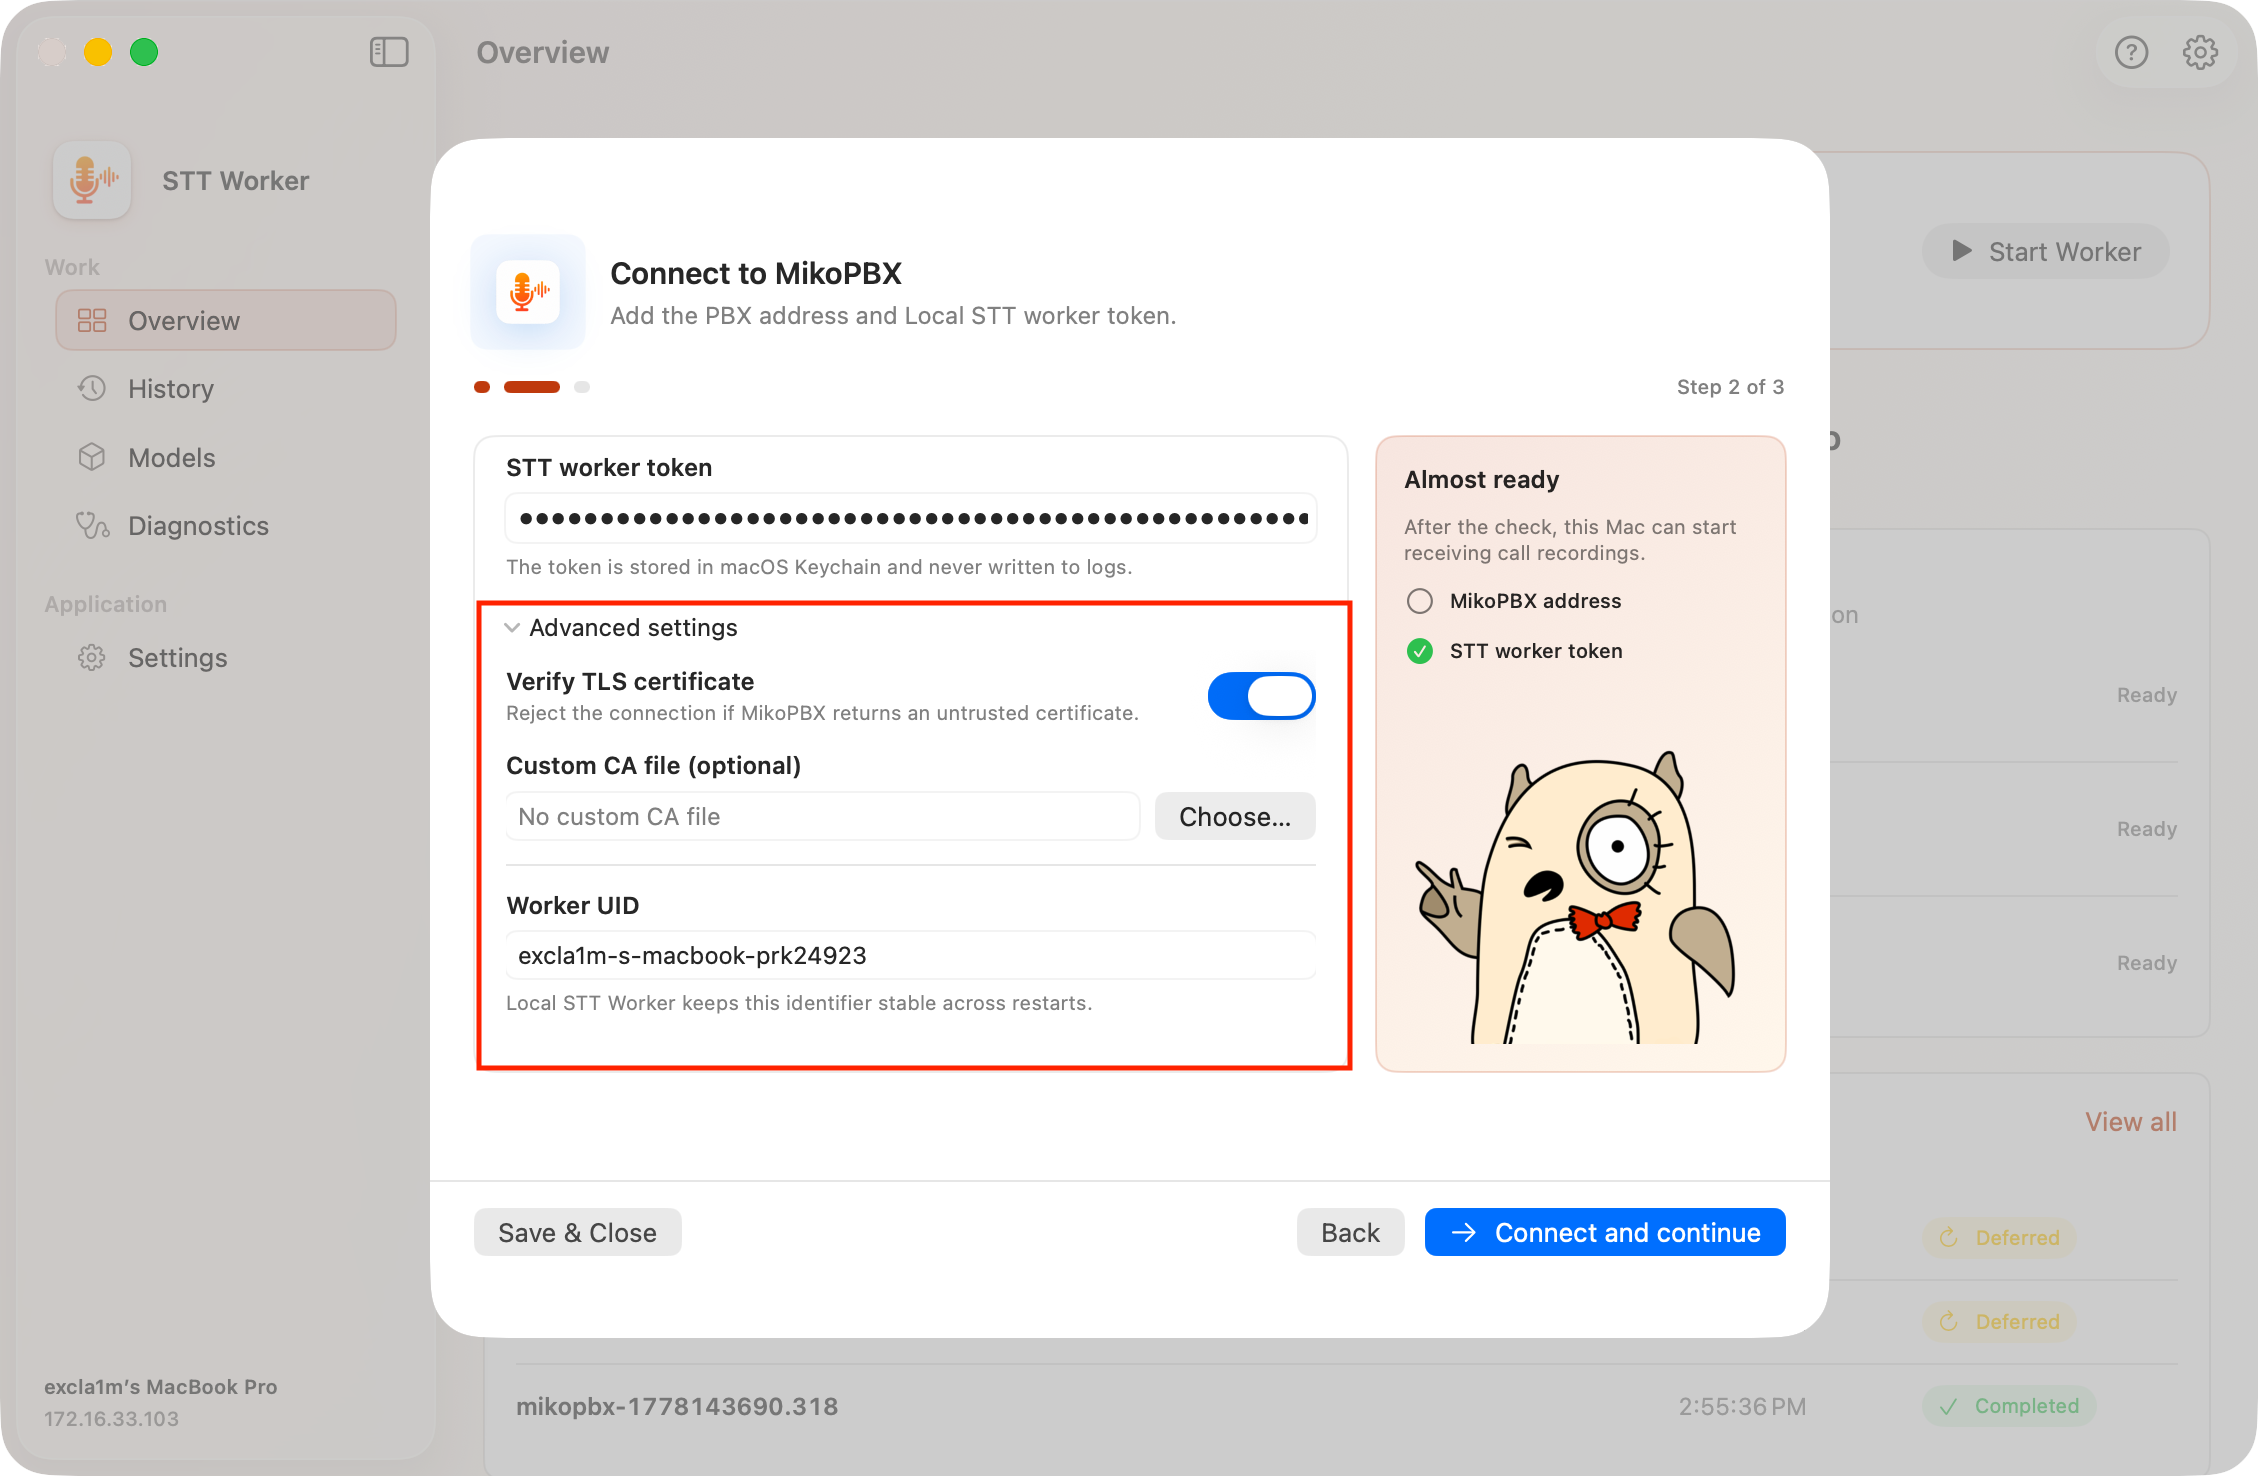
Expand **Advanced settings** to configure:

* TLS certificate verification;
* a custom CA PEM file;
* a custom worker UID.

<figure><img src="https://835495363-files.gitbook.io/~/files/v0/b/gitbook-x-prod.appspot.com/o/spaces%2FsZ8acWnNlSalIHQjMFu1%2Fuploads%2Fgit-blob-f69c9b7099c5f243cd7ac5a93d19dddd1e543aa8%2FUPDSTTOnboardingAdditionalSettings.png?alt=media" alt=""><figcaption><p>Advanced MikoPBX connection settings</p></figcaption></figure>

Click **Connect and continue**. The application checks the connection and validates the supplied settings.

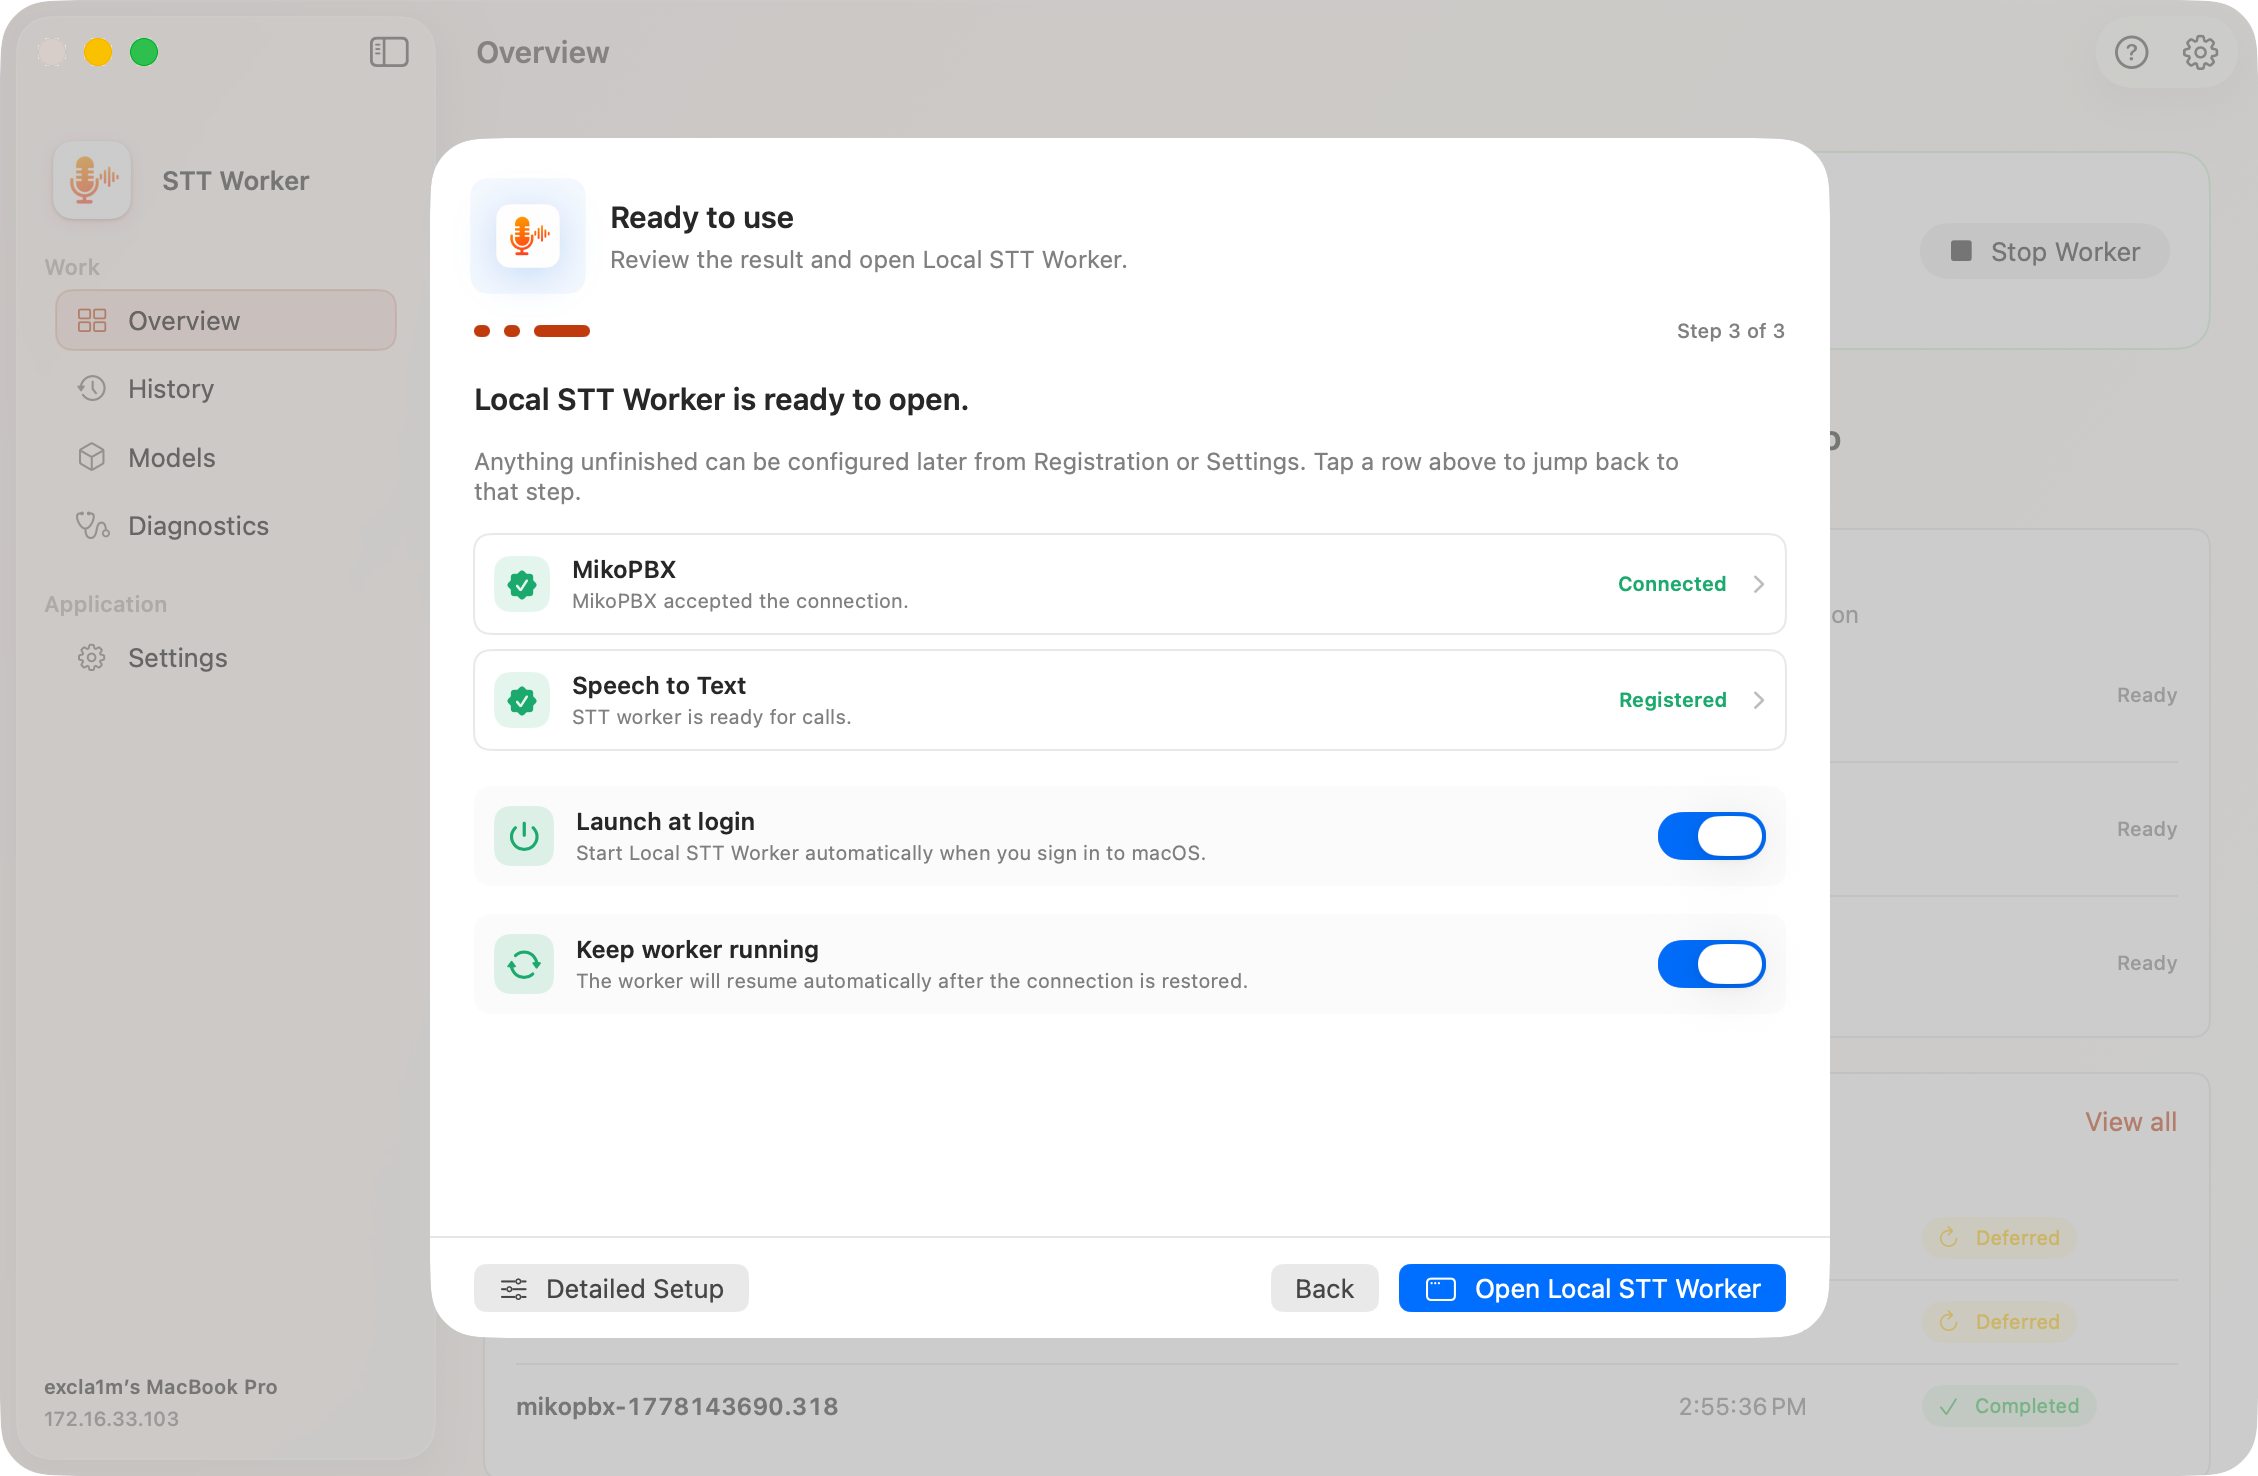
#### Step 3. Ready to use

The final step displays the MikoPBX and Speech to Text status and lets you enable two options:

* **Launch at login** — open Local STT Worker automatically when you sign in to macOS.
* **Keep worker running** — resume the worker automatically after the network connection is restored or the Mac wakes from sleep.

<figure><img src="https://835495363-files.gitbook.io/~/files/v0/b/gitbook-x-prod.appspot.com/o/spaces%2FsZ8acWnNlSalIHQjMFu1%2Fuploads%2Fgit-blob-6a4a75e01384e38bcd1859c1a311ecdaa367a897%2FUPDSTTOnboardingFinalPage.png?alt=media" alt=""><figcaption><p>Final Local STT Worker setup step</p></figcaption></figure>

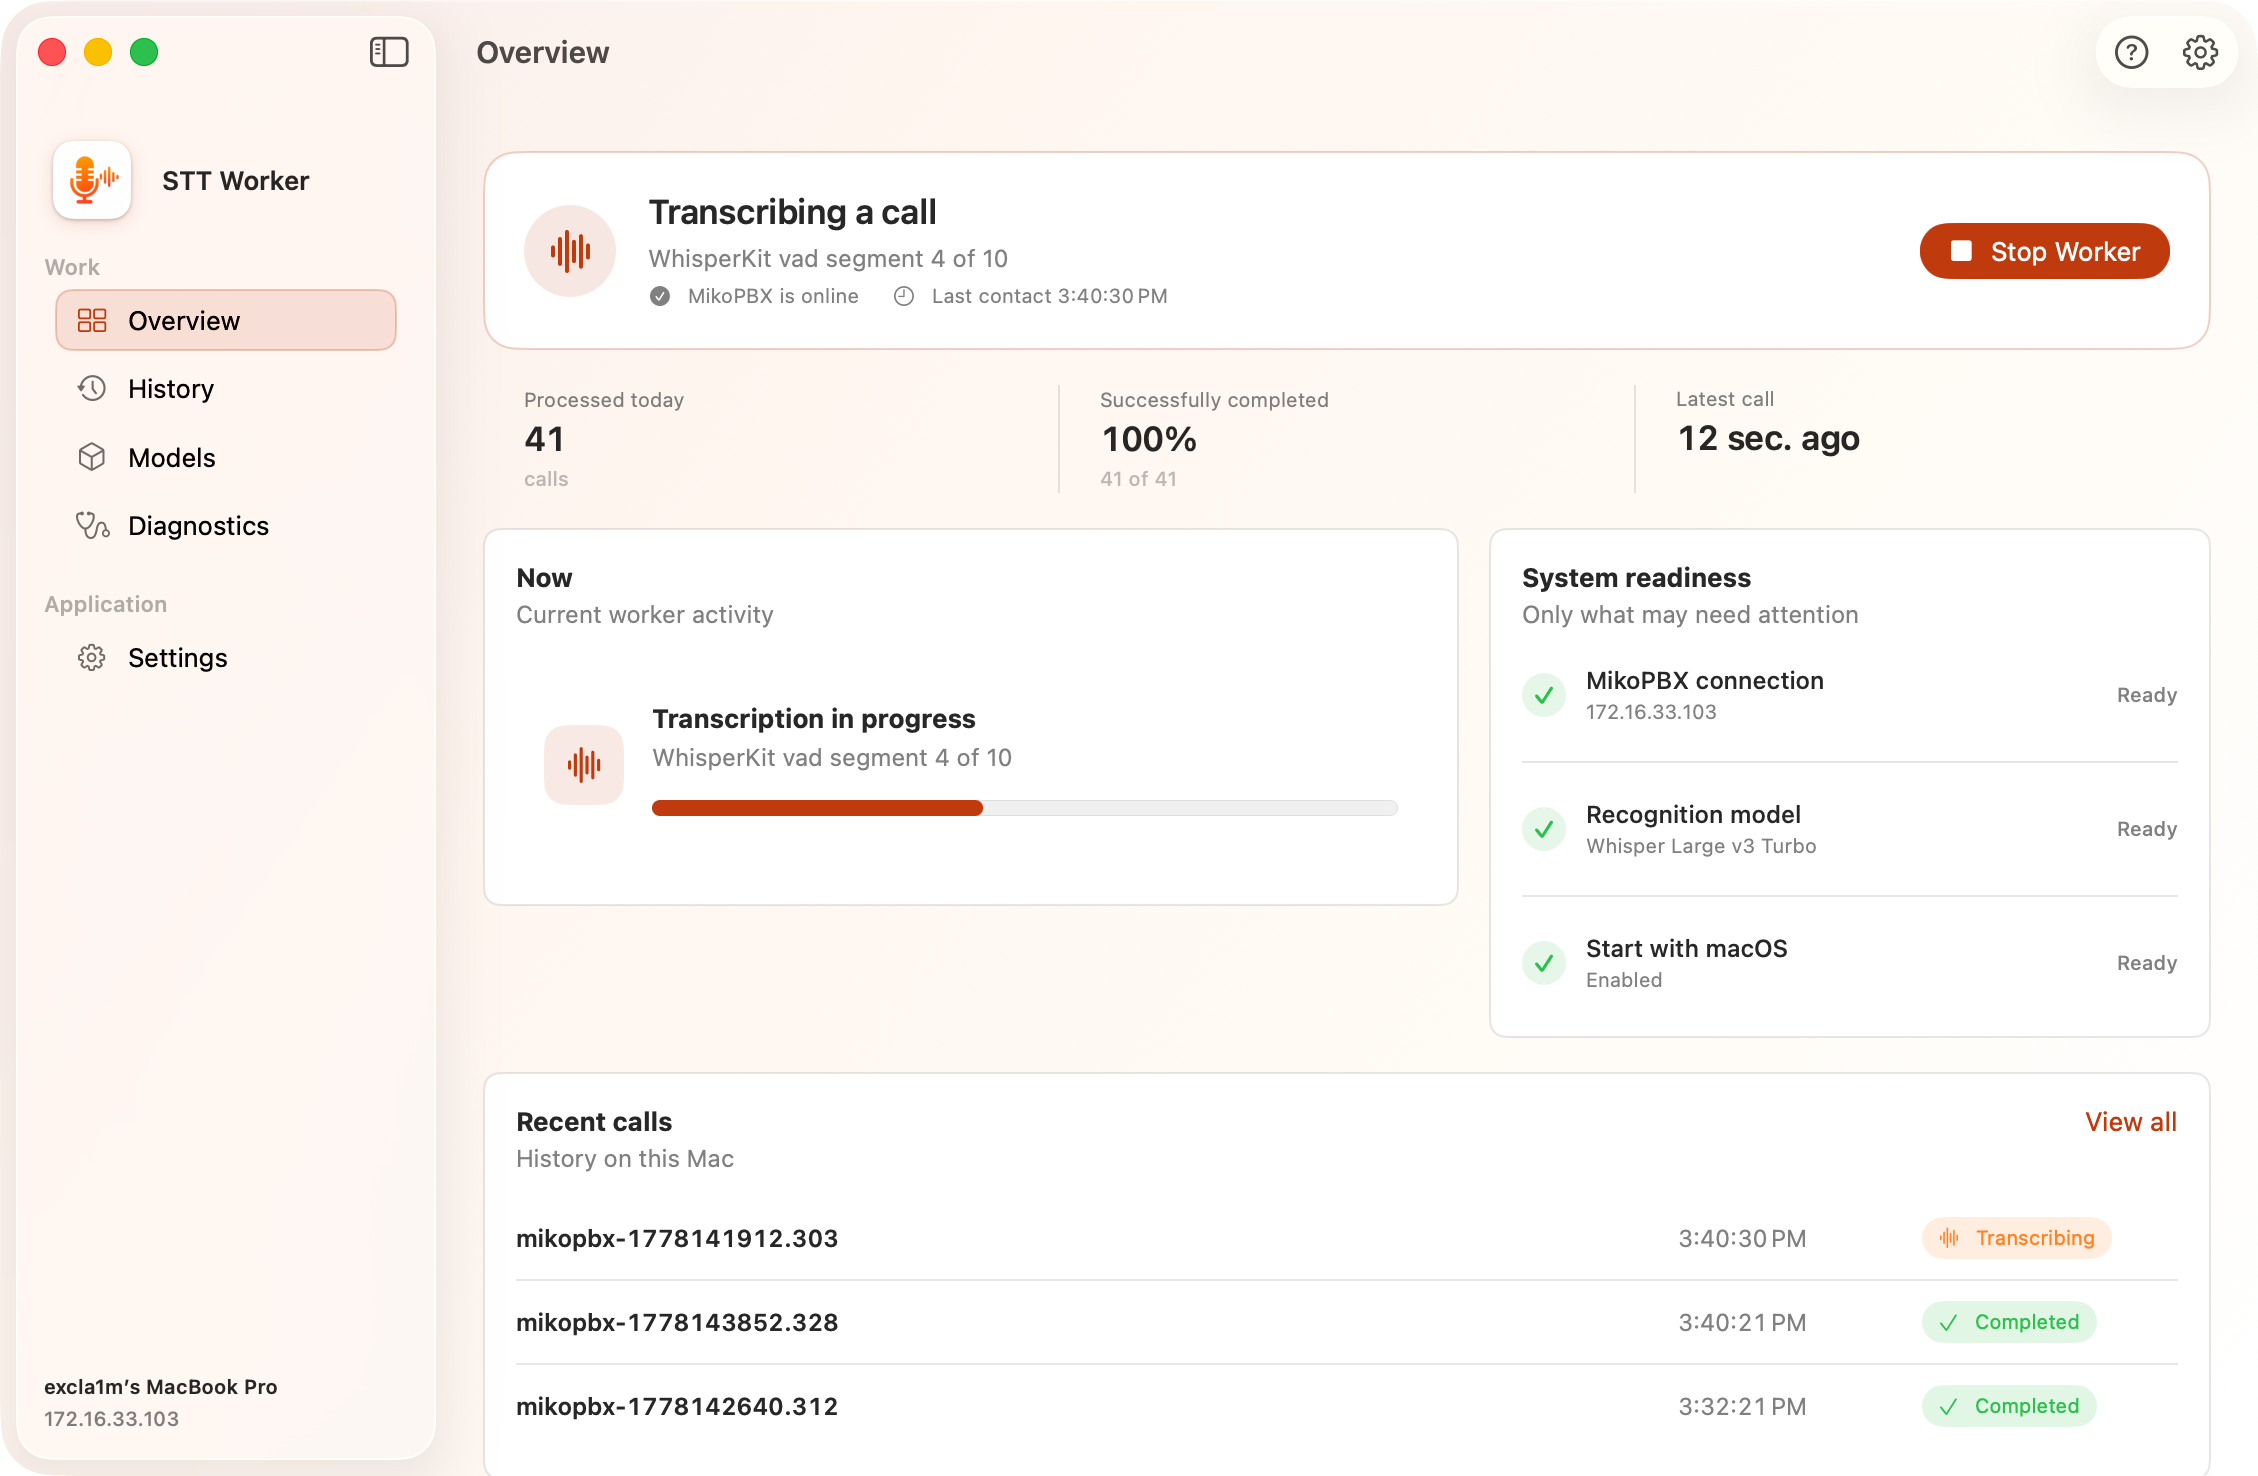
Click **Open Local STT Worker**. On the **Overview** page, click **Start Worker** if the worker is stopped. The readiness panel should display the model selected in MikoPBX.

### Verifying operation

1. Make a call for which call recording is enabled.
2. Wait for a job to appear on the module's **Queue** tab.
3. On first use, wait for the model to download to the Mac.
4. Check local processing stages under **Overview**, or review events under **Diagnostics**.
5. Open the completed result on the **Transcripts** tab in MikoPBX.

<figure><img src="https://835495363-files.gitbook.io/~/files/v0/b/gitbook-x-prod.appspot.com/o/spaces%2FsZ8acWnNlSalIHQjMFu1%2Fuploads%2Fgit-blob-5cccd8130db6f6a8d54094f61b5978d8936ebcf6%2FSTTWorkerTranscribationProcess.png?alt=media" alt=""><figcaption><p>Call processing on the worker Overview page</p></figcaption></figure>

See [Local STT Worker](/mikopbx/english/modules/miko/module-local-speech-to-text/miko-ai-worker.md) for a detailed description of the application sections.


---

# Agent Instructions
This documentation is published with GitBook. GitBook is the documentation platform designed so that both humans and AI agents can read, navigate, and reason over technical content effectively. Learn more at gitbook.com.

## Querying This Documentation
If you need additional information that is not directly available in this page, you can query the documentation dynamically by asking a question.

Perform an HTTP GET request on the current page URL with the `ask` query parameter, and the optional `goal` query parameter:

```
GET https://docs.mikopbx.com/mikopbx/english/modules/miko/module-local-speech-to-text/quick-start.md?ask=<question>&goal=<endgoal>
```

`ask` is the immediate question: it should be specific, self-contained, and written in natural language.
`goal` is optional and describes the broader end goal you are ultimately trying to accomplish on behalf of the user. GitBook uses it to tailor the answer towards what is most useful for that goal.

The response will contain a direct answer to the question and relevant excerpts and sources from the documentation.

Use this mechanism when the answer is not explicitly present in the current page, you need clarification or additional context, or you want to retrieve related documentation sections.