# MikoPBX 2026.1.223

<figure><img src="https://835495363-files.gitbook.io/~/files/v0/b/gitbook-x-prod.appspot.com/o/spaces%2FsZ8acWnNlSalIHQjMFu1%2Fuploads%2F1XQOtB60TL5VhFTRrdWg%2Ftelegram-cloud-photo-size-2-5379938956700489501-y.jpg?alt=media&#x26;token=99406196-dfca-4509-88ec-db7d6b05c387" alt=""><figcaption></figcaption></figure>

The Linux kernel and system libraries have been updated to the latest versions. Specifically, the Linux kernel has been updated to version 6.12.73, Asterisk to version 22.8.2, and PHP to version 8.4.16. The update provides improved performance, modern hardware support, and the latest security fixes.

### Full IPv6 support

MikoPBX now fully supports IPv6 on par with IPv4. A dual-stack mode has been implemented, allowing both protocols to be used simultaneously. Three IPv6 modes are available for each network interface: **Disabled**, **Automatic** (DHCPv6 with SLAAC fallback), and **Manual** (static address and gateway).

Configuration is done in the **Network and Firewall → Network Interfaces** section — select an interface and choose the desired IPv6 mode. For manual configuration, you will need to specify the IPv6 address, prefix length, and gateway.

The firewall supports rules for both IPv4 and IPv6. DNS can be configured separately for each protocol. The web interface is accessible via an IPv6 address.

<figure><img src="https://835495363-files.gitbook.io/~/files/v0/b/gitbook-x-prod.appspot.com/o/spaces%2FsZ8acWnNlSalIHQjMFu1%2Fuploads%2FDlp6IefzsqCv0lr9nQSm%2FRelease2026.1.IPv6Settings.png?alt=media&#x26;token=cee55afe-666f-416a-a0ff-fe2f0de82672" alt=""><figcaption><p>IPv6 configuration on a network interface</p></figcaption></figure>

### Static routes

The ability to configure static routes directly in the web interface has been added, eliminating the need for SSH access. This simplifies working with complex network topologies and networks with multiple gateways.

To add a route, open **Network and Firewall → Network Interfaces → Static Routes** and click **Add Route**. Specify the destination network and gateway.

<figure><img src="https://835495363-files.gitbook.io/~/files/v0/b/gitbook-x-prod.appspot.com/o/spaces%2FsZ8acWnNlSalIHQjMFu1%2Fuploads%2Fty4TZ6jgrMxuHNugupUF%2FRelease2026.1.StaticRoutes.png?alt=media&#x26;token=b1d2f391-abd6-4ddd-8278-056c5fb1a5c1" alt=""><figcaption><p>Static routes management</p></figcaption></figure>

### Cloud Provisioning - automatic configuration on deployment

MikoPBX automatically configures itself when deployed in a cloud or virtualization environment. Supported cloud providers include AWS, Google Cloud, Azure, Yandex Cloud, DigitalOcean, Vultr, VK Cloud, and Alibaba Cloud, as well as virtualization platforms VMware, Proxmox, KVM (via NoCloud), and containers Docker and LXC/Proxmox.

On startup, the system automatically applies settings from cloud-init: hostname, network parameters, administrator password, SSH keys, interface language, SIP ports, and network topology.

Example user-data for AWS EC2:

```yaml
#cloud-config
mikopbx:
  hostname: pbx-office
  web_password: MySecurePassword123!
  ssh_authorized_keys:
    - ssh-rsa AAAAB3NzaC1... admin@company.com
  pbx_settings:
    PBXLanguage: en-en
    SIPPort: 5160
  network:
    topology: private
```

After launching the instance, the system will configure itself automatically — simply log in to the web interface with the specified password.

<figure><img src="https://835495363-files.gitbook.io/~/files/v0/b/gitbook-x-prod.appspot.com/o/spaces%2FsZ8acWnNlSalIHQjMFu1%2Fuploads%2FnHvqRlixKns8ibcO0Mzx%2FRelease2026.1.CloudProvisioning.png?alt=media&#x26;token=268cc699-9512-4f7c-9396-4e1fb45c99e8" alt=""><figcaption><p>Cloud Provisioning workflow</p></figcaption></figure>

### LXC containers (Proxmox)

Full support for LXC system containers has been implemented for on-premise virtualization. Compared to Docker, LXC provides full network settings management, DHCP client support (IPv4/IPv6), firewall rule operation (with appropriate capabilities), and behavior similar to a full virtual machine but with lower resource consumption.

To deploy in Proxmox, create an LXC container with the MikoPBX image, configure networking (bridge, DHCP, or static IP), and optionally add the `CAP_NET_ADMIN` capability for firewall and network settings.

The container automatically reads `/etc/mikopbx-*.conf` files from Proxmox, configures the DNS search domain, and imports SSH keys.

Example Proxmox configuration:

```bash
# /etc/pve/lxc/100.conf
arch: amd64
cores: 2
memory: 2048
net0: name=eth0,bridge=vmbr0,firewall=1,ip=dhcp,type=veth
rootfs: local-lvm:vm-100-disk-0,size=32G
lxc.cap.keep: CAP_NET_ADMIN
```

MikoPBX installation guide for Proxmox LXC:

{% content-ref url="../../setup/hypervisor/proxmox/lxc" %}
[lxc](https://docs.mikopbx.com/mikopbx/english/setup/hypervisor/proxmox/lxc)
{% endcontent-ref %}

### Passkeys (WebAuthn) - passwordless login

Support for logging in using biometrics or a hardware security key has been added. Passkeys cannot be stolen like a regular password, and they are compatible with fingerprint scanners, Face ID, and USB/NFC keys (YubiKey, etc.).

To set up, open **System → General Settings**, in the **Passkeys** section click **Add Passkey** and follow the browser instructions. Each key can be given a name (e.g., "MacBook Touch ID").

<figure><img src="https://835495363-files.gitbook.io/~/files/v0/b/gitbook-x-prod.appspot.com/o/spaces%2FsZ8acWnNlSalIHQjMFu1%2Fuploads%2FN76YheCfvUhjDbzewuLY%2FaddPasskeyButton.png?alt=media&#x26;token=c7820644-751a-40a3-85eb-bfb15f92700a" alt=""><figcaption><p>Adding a Passkey in system settings</p></figcaption></figure>

A **Sign in with Passkey** button has been added to the login page — confirm with biometrics or a hardware key, and you are logged in without entering a password.

### REST API v3 — completely redesigned API

Detailed MikoPBX REST API v3 guide:

{% content-ref url="../../manual/system/api-keys" %}
[api-keys](https://docs.mikopbx.com/mikopbx/english/manual/system/api-keys)
{% endcontent-ref %}

The third version of the REST API has been released with 259 endpoints for managing all PBX functions. Key improvements: JWT authentication with Bearer tokens, granular access permissions for each API key, interactive documentation built into the web interface, and an OpenAPI 3.1.0 specification.

Interactive documentation is available at `https://your-pbx/admin-cabinet/api-keys/openapi` — select an endpoint and test it directly in the browser using the **Try it out** button.

Use cases: CRM integration for automatic extension creation, retrieving call statistics for dashboards, automating provider management and routing.

<figure><img src="https://835495363-files.gitbook.io/~/files/v0/b/gitbook-x-prod.appspot.com/o/spaces%2FsZ8acWnNlSalIHQjMFu1%2Fuploads%2F6lOSVROPx2FOCzEDa3En%2FRelease2026.1.ApiKeysPage.png?alt=media&#x26;token=2e4053ba-9862-4a91-ae4f-04e4debc854f" alt=""><figcaption><p>API Keys section in MikoPBX</p></figcaption></figure>

#### **Granular API key permissions**

When creating an API key, a permissions editor opens where you can select the access level for each resource (Extensions, CDR, Providers, etc.): **Read**, **Write**, or **Delete**. This ensures security, auditing, and isolation: different keys for different integrations with the minimum required permissions.

Examples: a CRM only needs a list of extensions — grant `Extensions: Read`; a billing system reads CDR — grant `CDR: Read`; an auto-provisioning system creates providers — grant `Providers: Write`.

<figure><img src="https://835495363-files.gitbook.io/~/files/v0/b/gitbook-x-prod.appspot.com/o/spaces%2FsZ8acWnNlSalIHQjMFu1%2Fuploads%2FmdbNziFEY3aDXUUWevIw%2FAPIKeyCallRecords.png?alt=media&#x26;token=55136de2-df02-4c9d-828f-1edf884b431f" alt=""><figcaption><p>
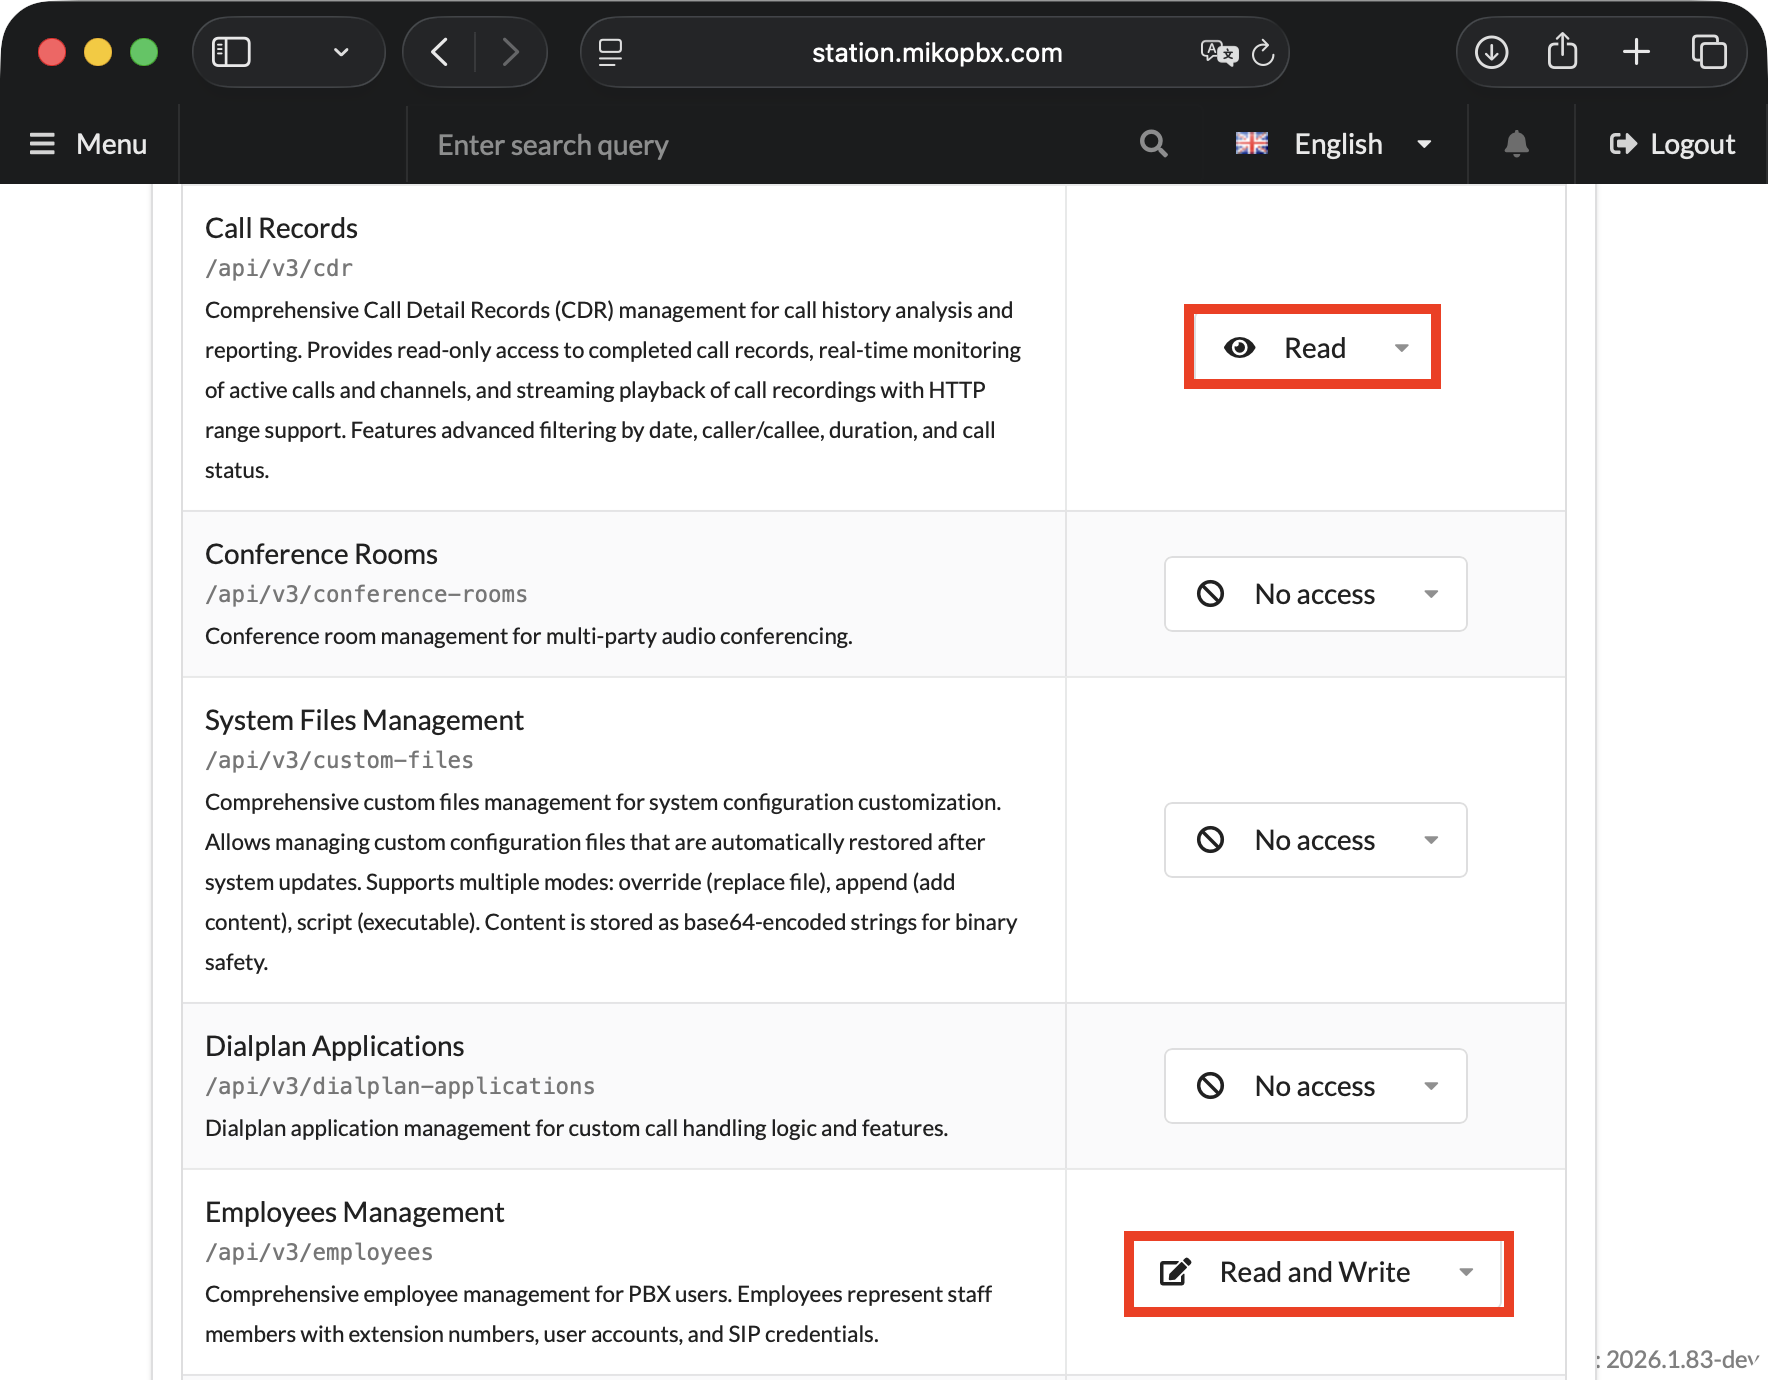
Example of granting Read access to Call Records and Read/Write to Employees Management</p></figcaption></figure>

### GeoIP2 — country detection by IP address

The system automatically identifies the country for each IP address using the free MaxMind GeoLite2 database, which is updated monthly and works without an internet connection.

The country flag is displayed in the blocked IP history (**Network & Firewall → Intrusion Protection → Blocked Addresses**).

<figure><img src="https://835495363-files.gitbook.io/~/files/v0/b/gitbook-x-prod.appspot.com/o/spaces%2FsZ8acWnNlSalIHQjMFu1%2Fuploads%2FEHT9lwK5xUySEQ0fqn0u%2FRelease2026.1.GeoIP2Fail2Ban.png?alt=media&#x26;token=326cd677-f7b0-4fad-833a-d0c5430daa4a" alt=""><figcaption><p>Country flags in the blocked IP list</p></figcaption></figure>

### S3 cloud storage for recordings

Automatic synchronization of call recordings to Amazon S3 or compatible storage has been implemented. This saves space on the PBX server, provides reliable cloud storage with automatic deletion of local files after upload, and ensures compliance with recording retention periods.

<figure><img src="https://835495363-files.gitbook.io/~/files/v0/b/gitbook-x-prod.appspot.com/o/spaces%2FsZ8acWnNlSalIHQjMFu1%2Fuploads%2Fcxi2fkBpwE7wIMAt6qjh%2FRelease2026.1.S3Diagram.png?alt=media&#x26;token=163267e9-b7f3-4af5-919a-f49df31830ac" alt=""><figcaption><p>S3 storage workflow diagram in MikoPBX</p></figcaption></figure>

To configure, open **Maintenance → Storage → S3 Cloud Storage**, enter the connection parameters (Endpoint, Access Key, Secret Key, Bucket, Region), enable auto-sync, and set the retention period. Sync status, percentage of uploaded recordings, and error notifications are displayed in the web interface.

More details in the article:

{% content-ref url="../../manual/maintenance/storage" %}
[storage](https://docs.mikopbx.com/mikopbx/english/manual/maintenance/storage)
{% endcontent-ref %}

### Asterisk REST Interface (ARI)

ARI user management has been added for advanced integrations. You can now create ARI users for external applications, control access to the ARI WebSocket, and integrate with external call-control systems.

Management is available in **System → ARI Access**. Use cases: developing custom IVR applications, contact center integration, implementing custom call handling logic.

<figure><img src="https://835495363-files.gitbook.io/~/files/v0/b/gitbook-x-prod.appspot.com/o/spaces%2FsZ8acWnNlSalIHQjMFu1%2Fuploads%2FlpSeikm1kckgei6r5Gn8%2FAMI%26ARIinGenSettings.png?alt=media&#x26;token=4be1d436-01d0-47d8-8ef0-f70cf311a206" alt=""><figcaption><p>Enabling the ARI interface in the ARI Settings section</p></figcaption></figure>

### IAX trunks

Support for the IAX2 protocol has been added for connecting to providers and offices. IAX is a NAT-friendly alternative to SIP and creates less load on the firewall by using a single port instead of an RTP range.

To configure, open **Routing → Telephony Providers**, click **Connect IAX**, fill in the provider parameters (Host, Username/Password, context), and set up routing rules.

<figure><img src="https://835495363-files.gitbook.io/~/files/v0/b/gitbook-x-prod.appspot.com/o/spaces%2FsZ8acWnNlSalIHQjMFu1%2Fuploads%2FXc0etXS0JteoS7SrIOl5%2FRelease2026.1.IAX.png?alt=media&#x26;token=b0dd2b68-3269-4a2b-b354-3a9499546527" alt=""><figcaption><p>Adding an IAX trunk</p></figcaption></figure>

### OAuth2 for email

Secure integration with modern email services has been implemented without the need to create app passwords. Microsoft 365 / Outlook, Gmail / Google Workspace, and Yandex Mail are supported. OAuth2 provides more secure authentication and works correctly with two-factor authentication.

More details in the article:

{% content-ref url="../../manual/system/mail-settings-1" %}
[mail-settings-1](https://docs.mikopbx.com/mikopbx/english/manual/system/mail-settings-1)
{% endcontent-ref %}

<figure><img src="https://835495363-files.gitbook.io/~/files/v0/b/gitbook-x-prod.appspot.com/o/spaces%2FsZ8acWnNlSalIHQjMFu1%2Fuploads%2FyirZ0OwYTyTM5Q8lU3Ns%2FSMTPParametersGmailOAuth2ast.png?alt=media&#x26;token=3ffcd381-adfd-42f4-86c7-05885e718b09" alt=""><figcaption><p>Example OAuth2 configuration for Gmail</p></figcaption></figure>

### Admin panel login notifications

Email notifications have been added for every login to the administration system. The notification includes the date and time of login, IP address, country (via GeoIP2), and username.

To enable, open **System → Notifications → Email Notifications**, activate the **Notify on system login** option, and specify the email address for notifications.

<figure><img src="https://835495363-files.gitbook.io/~/files/v0/b/gitbook-x-prod.appspot.com/o/spaces%2FsZ8acWnNlSalIHQjMFu1%2Fuploads%2FtMouc15VTOkrxBf8T8tT%2FRelease2026.1.LoginNotification.png?alt=media&#x26;token=565de538-34dd-4f29-abc5-3911e64b3929" alt=""><figcaption><p>Example email notification on login</p></figcaption></figure>

### ESXi-style console menu

A full-screen status menu with system information and metrics has been implemented, displayed when connecting to the server console (IPMI, virtual console, SSH).

The menu displays the MikoPBX ASCII logo, current IP addresses of all interfaces, CPU, memory, and disk usage, and other useful information. Press any key to access the console menu. Available actions include: network configuration, reboot/shutdown, log viewing, system monitoring, integrity checks, and module management. In the status menu, press **Ctrl+C** to exit to the shell.

<figure><img src="https://835495363-files.gitbook.io/~/files/v0/b/gitbook-x-prod.appspot.com/o/spaces%2FsZ8acWnNlSalIHQjMFu1%2Fuploads%2F7qk7EoVOGQrzVg71E7E8%2FRelease2026.1.ConsoleMenu.png?alt=media&#x26;token=261c9d34-86be-43e6-a61b-600c6ced4fe1" alt=""><figcaption><p>MikoPBX status menu</p></figcaption></figure>

### CSV import/export of employees

Bulk upload and download of extensions via CSV files has been added. This simplifies creating dozens or hundreds of extensions, migrating from other PBX systems, and backing up settings.

To import, open **Employees**, click **Import from CSV**, and select a file with columns: `number`, `mobile`, `email`, `name`, `username`, `secret`. Three update strategies are available: **Merge** (update existing, add new), **Replace** (overwrite existing), and **Skip** (add only new).

Export works similarly — click **Export to CSV** to download a file with all extensions.

<figure><img src="https://835495363-files.gitbook.io/~/files/v0/b/gitbook-x-prod.appspot.com/o/spaces%2FsZ8acWnNlSalIHQjMFu1%2Fuploads%2FDqLmLJy2DMmoueyydiwz%2FCSVImportExtensionsP2.png?alt=media&#x26;token=bb6140bc-72c5-46fa-a28b-3290db404da5" alt=""><figcaption><p>Employee import and result handling strategy</p></figcaption></figure>

More details in the **Extensions** article:

{% content-ref url="../../manual/telephony/extensions" %}
[extensions](https://docs.mikopbx.com/mikopbx/english/manual/telephony/extensions)
{% endcontent-ref %}

### Configuration cloning

A **Save as Copy** function has been added for quickly duplicating IVR menu, queue, conference, and Asterisk Manager user settings. Open an existing configuration card, click **Save as Copy**, change the name and parameters — an independent copy will be created.

Use cases: creating similar IVRs for different offices, duplicating queues with minor changes, testing changes on a copy.

### DataTable improvements

Data tables have been updated throughout the interface. A retry mechanism with automatic retry on network errors has been added, along with ACL integration (automatic hiding of inaccessible actions) and CDR filter persistence between page refreshes. The code has been optimized to ES6 for faster loading.

### Interactive tooltips

Contextual tooltips with detailed explanations of settings have been added. An **(i)** icon has appeared next to complex parameters — hovering over it displays a tooltip with a plain-language explanation. Tooltips are available in provider settings (codecs, transport), network parameters (MTU, VLAN), and security settings (Rate Limit, Fail2Ban).

<figure><img src="https://835495363-files.gitbook.io/~/files/v0/b/gitbook-x-prod.appspot.com/o/spaces%2FsZ8acWnNlSalIHQjMFu1%2Fuploads%2FQZkXVW3e9LcEYOLRMwVZ%2FRelease2026.1.Tooltips.png?alt=media&#x26;token=9e35504f-a752-4fc1-a9d4-d0f9d2df907e" alt=""><figcaption><p>Interactive tooltips in provider settings</p></figcaption></figure>

### Storage visualization

A graphical display of disk space usage has been added in **Maintenance → Storage → Storage Information**. The chart shows space distribution by category: call recordings, system logs, backup files, modules, and other files — with percentages and sizes for each category.

<figure><img src="https://835495363-files.gitbook.io/~/files/v0/b/gitbook-x-prod.appspot.com/o/spaces%2FsZ8acWnNlSalIHQjMFu1%2Fuploads%2Fx5m3G2CBB2HrJabQDJNJ%2FstorageInformationTabMikoPBX.png?alt=media&#x26;token=7f0a6690-cf25-4af7-bc46-7a30fe7905b7" alt=""><figcaption><p>Disk space usage visualization</p></figcaption></figure>

***

### Security improvements

#### **SHA-512 password hashes**

Passwords are now stored in SHA-512 format instead of the previously used MD5. Migration occurs automatically on the user's first login — no action is required from the administrator.

#### **Intrusion protection levels**

The Fail2Ban configuration interface has been redesigned. Instead of manually entering parameters, a slider with four preset protection levels is now available, each of which automatically configures the number of allowed attempts, observation period, and ban duration:

* **Low** — 20 attempts in 10 minutes, ban for 10 minutes. Suitable for initial setup and trusted networks.
* **Normal** — 10 attempts in 1 hour, ban for 1 day. Recommended for most installations.
* **High** — 5 attempts in 6 hours, ban for 7 days. For internet-facing servers.
* **Paranoid** — 3 attempts in 24 hours, ban for 30 days. For servers under active attack.

Make sure administrator IP addresses are added to the whitelist before increasing the protection level.

<figure><img src="https://835495363-files.gitbook.io/~/files/v0/b/gitbook-x-prod.appspot.com/o/spaces%2FsZ8acWnNlSalIHQjMFu1%2Fuploads%2Fyma3C5axbdyc7gixuwBF%2FRelease2026.1.Fail2BanLevels.png?alt=media&#x26;token=771a6fef-3c4e-4aff-80de-5b880a10ba28" alt=""><figcaption><p>Intrusion protection level configuration</p></figcaption></figure>

<figure><img src="https://835495363-files.gitbook.io/~/files/v0/b/gitbook-x-prod.appspot.com/o/spaces%2FsZ8acWnNlSalIHQjMFu1%2Fuploads%2FEHT9lwK5xUySEQ0fqn0u%2FRelease2026.1.GeoIP2Fail2Ban.png?alt=media&#x26;token=326cd677-f7b0-4fad-833a-d0c5430daa4a" alt=""><figcaption><p>Blocked IP list</p></figcaption></figure>

#### **SIP Rate Limiting**

A limit on the number of new SIP connections from a single IP address has been added to protect against DDoS and flood attacks on the SIP server. It is configured via the PBXFirewallMaxReqSec parameter; protection works at the firewall level (iptables recent).

#### **Path traversal protection in CDR**

A vulnerability that could potentially allow downloading system files via the API has been fixed: path validation for recording files has been added.

#### **Shell escaping in DHCP callbacks**

A vulnerability related to potential command injection via DHCP parameters has been fixed: command argument escaping has been added.

***

### Configuration changes

#### **Docker deployment**

Docker container operation remains unchanged. Cloud provisioning support via environment variables and a unified entrypoint for Docker and LXC have been added.

Example launch:

```bash
docker run -d \
  -e WEB_ADMIN_PASSWORD=MyPassword123 \
  -e WEB_SSH_PASSWORD=SshPassword456 \
  -e PBX_NAME=office-pbx \
  -e PBX_LANGUAGE=en-en \
  -p 80:80 -p 443:443 -p 5060:5060/udp \
  mikopbx/mikopbx:latest
```

#### **LXC deployment**

Full LXC container support with in-container network management, DHCP support (IPv4/IPv6), and firewall operation with `CAP_NET_ADMIN`.
